Make App Pie

Training for Developers and Artists

Swift Swift: Using Tab Bar Controllers in Swift

[Updated to Swift 2.0/iOS9.0 9/20/2015 SJL]
While Navigation controllers often have the limelight when it comes to Xcode’s view  controllers, tab bar controllers are better for independent tasks in the same app, or for different ways of working with the same model. In this lesson we’ll take a look at tab bar controllers and after a short part about the template, how to make them in Swift programmatically. If you are interested in tab bar controllers on the storyboard, You might want to read this post. For passing data between tabs, on the storyboard can be found here.

Tab Bar Programmatically

While there are very easy storyboard ways of making tab bar controllers, We can do much of this programmatically. Start with a single view template and create a Swift project called TabProgDemo. Create two subclasses of UIViewController, named PieVC and PizzaVC. For each, make sure to make the language Swift, and check the mark to make a Xib file for an iPhone like this:

Screenshot 2014-09-07 16.14.07

Click open the AppDelegate.swift file. Replace the class with the following:

class AppDelegate: UIResponder, UIApplicationDelegate {

    var window: UIWindow?
    func application(application: UIApplication,
                      didFinishLaunchingWithOptions launchOptions: [NSObject: AnyObject]?) -> Bool {
        let tabBarController = UITabBarController()
        let myVC1 = PieVC(nibName: "PieVC", bundle: nil)
        let myVC2 = PizzaVC(nibName: "PizzaVC", bundle: nil)
        let controllers = [myVC1,myVC2]
        tabBarController.viewControllers = controllers
        window?.rootViewController = tabBarController
        let firstImage = UIImage(named: "pie bar icon")
        let secondImage = UIImage(named: "pizza bar icon")
        myVC1.tabBarItem = UITabBarItem(
            title: "Pie",
            image: firstImage,
            tag: 1)
        myVC2.tabBarItem = UITabBarItem(
            title: "Pizza",
            image: secondImage,
            tag:2)

        return true
    }
}

Let’s look at this code part by part. First we have this:

let tabBarController = UITabBarController()
let myVC1 = PieVC(nibName: "PieVC", bundle: nil)
let myVC2 = PizzaVC(nibName: "PizzaVC", bundle: nil)

Creates an instance of a UITabBarController. We then create two view controllers using the xibs as our user interface. In full accordance with the adage “Life is uncertain, eat dessert first”, we’ll make the first page on launch be the pie page.

Let’s look at the next three lines:

let controllers = [myVC1,myVC2]
tabBarController.viewControllers = controllers
window?.rootViewController = tabBarController

TabBarControllers have a property called viewControllers, which is an array of the view controllers in the order displayed in the tab bar. Our first line of this segment makes an array of view controllers in the order we want them to present. Next we assign the array to the tab bar controller. The last line assigns the controller as the root view controller.

We have out controller set up, but no titles or icons. The rest of this code assigns the title and image.

let firstImage = UIImage(named: "pie bar icon")
let secondImage = UIImage(named: "pizza bar icon")
myVC1.tabBarItem = UITabBarItem(
    title: "Pie",
    image: firstImage,
    tag: 1)
myVC2.tabBarItem = UITabBarItem(
    title: "Pizza",
    image: secondImage,
    tag:2)

We have not loaded the images yet. You can download these images in this file.BarIcons.zip. Unzip the file and then place the small and the @2x pie bar image in the Assets.xcassets folder.

2015-09-18_18-55-45

It should show up in the asset library as one set of images

2015-09-18_18-56-09

Repeat this for the pizza icons. For more on creating the icons, see the storyboard version of this post.

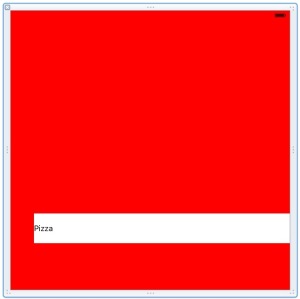
Our next step is to set up the xibs. Click the pizzaVC.xib file, change the background color of the Xib to red, and place a label with a white background in the lower left tiled Pizza. Leave enough space on the bottom for the tab bar.

2015-09-20_10-26-41

If you wish you can pin this label 50 left 0 right 100 bottom and 64 high, remembering to update the constraints.

2015-09-20_10-28-49

Do the same for the PieVC.xib file, making the background green, and the label with a white background Pie. Use the Same constraints if you plan to use autolayout.

2015-09-20_10-31-21

That is all you need to do. Build and run, and you will get two view controllers you can switch between.

2015-09-20_10-34-38

2015-09-20_10-35-10

Passing Data between View Controllers

While you can use delegates between view controllers in tab bar controllers, it’s debatable if you want to. Tab bar controllers break down MVC a bit. We use Tab bars for two conditions: when the view controllers are completely independent of each other and when they share the same model. Apple’s clock app is an example of a completely independent application. Though the theme is time, the stopwatch has nothing to do with the countdown timer. They do not share data and thus have completely independent models. We do not share anything and essentially have multiple apps running on different tabs, though with a particular theme.

On the other hand, there may be one common model among all or some of the tabs which uses it differently. The music app uses the same model arranged differently in the song, album, and artist tabs for example.

View Controllers on a tab bar controller, unlike navigation controllers or Modal views, exist parallel to each other in to the array viewControllers.   When they disappear from the screen, they are not destroyed or made inactive. When they appear, they are not loaded. There are several ways to share a model between controllers. One popular which is very dangerous and should never be used is share the model in the app delegate. This is a global variable, which for safety and security purposes should be avoided. Another is to access the view controller through the tabBarControllers property, which is the array of view controllers. This can get complicated quickly, since you need the subclass of UIViewController. The best way is to make a subclass of UITabBarController with the model as a property of the subclass. This way all the tab bar controllers share that same model, and all update the same model, but nothing else can touch the model.

Let’s make a simple model for another pizza and pie ordering app. In Xcode, press Command-N Create a new Cocoa Touch Class subclassing NSObject called OrderModel. Change the code for OrderModel to look like this:

import UIKit
class OrderModel: NSObject {
    var pizza:String = "No"
    var pie:String = "No"
 
    func currentOrder() -> String{ //return a string with the current order
        return pizza + " pizza and " + pie + " pie"
    }
}

We have two properties and one method in this model. We’ll store an order for one pizza and one pie, and have a method to return what our order is.

Our next step is to subclass UITabBarController. Under the OrderModel class add the following class

class OrderTabBarController:UITabBarController{
    let order = OrderModel()
}

We have added one property to the tab bar controller, which is our model. In the app delegate change this line

let tabBarController = UITabBarController()

to this:

let tabBarController = OrderTabBarController() //Tab bar controller with model

Go into the PizzaVC and clean out the code there. I removed all the regular template stuff for clarity and brevity.

class PizzaVC: UIViewController {
    
}

View controllers have a property tabBarController. When a view controller is connected to a UITabBarController, this property points back to the Tab Bar controller. Go to the PizzaVC class and add this code just after the class declaration:

private var tbvc = OrderTabBarController()
private var myOrder = OrderModel()

Add viewDidLoad to the class:

override func viewDidLoad() {
    super.viewDidLoad()
//get the reference to the shared model
    tbvc = tabBarController as! OrderTabBarController
    myOrder = tbvc.order
}

While we could have done this with one line and property, for clarity I did it in two. tbvc gets the table view controller and down casts it to OrderTabBarController. The property myOrder gets the pointer to the model in the Tab controller. Notice I made sure nothing external has access to these two properties and made both private

We have our order model. Add an outlet and action this code to our PizzaVC class.

  
@IBOutlet weak var orderLabel: UILabel!
@IBAction func orderButton(sender: UIButton) {
    myOrder.pizza = (sender.titleLabel?.text)!
    orderLabel.text = myOrder.currentOrder()
}

When we press a button, the title of the button will be the pizza order. We then use the currentOrder method to give us our complete order.

Since viewDidLoad only loads once per view controller in a tab controller, it is not where we want to update a view when returning from another tab view. Instead we need viewWillAppear. Add this code:

override func viewWillAppear(animated: Bool) {
    super.viewWillAppear(animated)
    orderLabel.text = myOrder.currentOrder()
}

Our label will update whenever this view appears.

Let’s code the pie. Change the PieVC.swift file as follows:

class PieVC: UIViewController{  
    private var myOrder = OrderModel()
    private var tbvc = OrderTabBarController()
    @IBOutlet weak var orderLabel: UILabel!

    override func viewWillAppear(animated: Bool) {
        super.viewWillAppear(animated)
        orderLabel.text = myOrder.currentOrder()
    }
    override func viewDidLoad() {
        super.viewDidLoad()
        //get the reference to the shared model
        tbvc = tabBarController as! OrderTabBarController
        myOrder = tbvc.order
    }
}
We start with almost identical code to the Pizza’s code. This time we’ll use a picker for our pie choices. If you are interested in UIPickerView, see my lesson on Implementing UIPickerView for details of what we are doing here. Add the delegate and data source to the class declaration.

class PieVC: UIViewController,
    UIPickerViewDataSource, UIPickerViewDelegate
{

You’ll get an error, which we will deal with later. Under the class declaration’s bracket, add the outlet and selection data

let selections = [
    "Apple",
    "Cherry",
    "Banana Cream",
    "Key Lime",
]
@IBOutlet weak var piePicker: UIPickerView!

In viewDidLoad add the delegate and data source

piePicker.delegate = self
piePicker.dataSource = self

Then implement the delegate and data source, which should remove the error on the class declaration.


    func pickerView(pickerView: UIPickerView, numberOfRowsInComponent component: Int) -> Int {
        return selections.count 
    }
    func numberOfComponentsInPickerView(pickerView: UIPickerView) -> Int {
        return 1
    }
    func pickerView(pickerView: UIPickerView, titleForRow row: Int, forComponent component: Int) -> String? {
        return selections[row]
    }
    func pickerView(pickerView: UIPickerView, didSelectRow row: Int, inComponent component: Int) {
        myOrder.pie = selections[row]
        orderLabel.text = myOrder.currentOrder()
    }
    

Most of the code above runs the picker. The key two lines of code are similar to what we used in the button on PizzaVC

myOrder.pie = selections[row]
orderLabel.text = myOrder.currentOrder()

The first line here takes the selection and makes it the value of the pie property. The second updates our display using the currentOrder method.

Laying out the Xibs

Now that we have code go to the PizzaVC.xib file. Add two or more buttons and a label to the xib, all with white backgrounds.

2015-09-20_11-15-56

Title one button Cheese and one Pepperoni I used autolayout to make it look pretty but that is up to you. For those using autolayout, I pinned the label 30 points to the top margin and the buttons 10 points up to whatever is above it. All these views get pinned 50 points to the left and 0 points to the right. I also made everything 44 points high.

2015-09-20_11-20-44

Open the assistant editor and hook up the buttons to the IBAction. Hook up the label to the orderlabel outlet.

Go to the pieVC.xib file and add a label and a picker view. Again I used autolayout first pinning the label to the top the same as I did for the pizza. I added the picker view between the two labels, and then pinned the picker 20 points on all sides.

2015-09-20_11-24-15

Using the assistant editor, hook up the picker to the piePicker outlet and the label to the orderLabel outlet.

Build and run. Switch between the two tabs and change the data.

2015-09-20_11-32-36

2015-09-20_11-32-12

This covers the basics of programmatic Tab bar controllers. To be clear, I don’t use the programmatic version, because the storyboard versions are a lot easier to use and more powerful right out of the box. For more on Storyboard tab bar controllers, look at this post

The Whole Code

AppDelegate.swift

//
//  AppDelegate.swift
//  TabBarDemo
//
//  Created by Steven Lipton on 9/20/15.
//  Copyright © 2015 MakeAppPie.Com. All rights reserved.
//  New version for Swift 2.0/iOS9

import UIKit

@UIApplicationMain
class AppDelegate: UIResponder, UIApplicationDelegate {
    
    var window: UIWindow?
    func application(application: UIApplication,
        didFinishLaunchingWithOptions launchOptions: [NSObject: AnyObject]?) -> Bool {
            let tabBarController = OrderTabBarController() //Tab bar controller with model
            //let tabBarController = UITabBarController()
            let myVC1 = PieVC(nibName: "PieVC", bundle: nil)
            let myVC2 = PizzaVC(nibName: "PizzaVC", bundle: nil)
            let controllers = [myVC1,myVC2]
            tabBarController.viewControllers = controllers
            window?.rootViewController = tabBarController
            let firstImage = UIImage(named: "pie bar icon")
            let secondImage = UIImage(named: "pizza bar icon")
            myVC1.tabBarItem = UITabBarItem(
                title: "Pie",
                image: firstImage,
                tag: 1)
            myVC2.tabBarItem = UITabBarItem(
                title: "Pizza",
                image: secondImage,
                tag:2)
            return true
    }
}

OrderModel.Swift

//
//  OrderModel.swift
//  TabBarDemo
//
//  Created by Steven Lipton on 9/20/15.
//  Copyright © 2015 MakeAppPie.Com. All rights reserved.
//  New Version for Swift 2.0/iOS9

import UIKit

class OrderModel: NSObject {
    var pizza:String = "No"
    var pie:String = "No"
    
    func currentOrder() -> String{ //return a string with the current order
        return pizza + " pizza and " + pie + " pie"
    }
}


class OrderTabBarController:UITabBarController{
    let order = OrderModel()
}

PieVC.swift

//
//  PieVC.swift
//  TabBarDemo
//
//  Created by Steven Lipton on 9/20/15.
//  Copyright © 2015 MakeAppPie.Com. All rights reserved.
//  New Version for Swift 2.0/iOS9

import UIKit

class PieVC: UIViewController,
    UIPickerViewDataSource, UIPickerViewDelegate
{
    let selections = [
        "Apple",
        "Cherry",
        "Banana Cream",
        "Key Lime",
    ]
    @IBOutlet weak var piePicker: UIPickerView!
    private var myOrder = OrderModel()
    private var tbvc = OrderTabBarController()
    @IBOutlet weak var orderLabel: UILabel!
    
    override func viewWillAppear(animated: Bool) {
        super.viewWillAppear(animated)
        orderLabel.text = myOrder.currentOrder()
    }
    override func viewDidLoad() {
        super.viewDidLoad()
        //get the reference to the shared model
        tbvc = tabBarController as! OrderTabBarController
        myOrder = tbvc.order
        piePicker.delegate = self
        piePicker.dataSource = self
       
    }
    //MARK: Delegates and Data sources
    
    func pickerView(pickerView: UIPickerView, numberOfRowsInComponent component: Int) -> Int {
        return selections.count
    }
    func numberOfComponentsInPickerView(pickerView: UIPickerView) -> Int {
        return 1
    }
    func pickerView(pickerView: UIPickerView, titleForRow row: Int, forComponent component: Int) -> String? {
        return selections[row]
    }
    func pickerView(pickerView: UIPickerView, didSelectRow row: Int, inComponent component: Int) {
        myOrder.pie = selections[row]
        orderLabel.text = myOrder.currentOrder()
    }
    
}

PizzaVC.Swift

//
//  PizzaVC.swift
//  TabBarDemo
//
//  Created by Steven Lipton on 9/20/15.
//  Copyright © 2015 MakeAppPie.Com. All rights reserved.
//  New Version for Swift 2.0/iOS9

import UIKit

class PizzaVC: UIViewController {
    private var myOrder = OrderModel()
    private var tbvc = OrderTabBarController()
    @IBOutlet weak var orderLabel: UILabel!
    @IBAction func orderButton(sender: UIButton) {
        myOrder.pizza = (sender.titleLabel?.text)!
        orderLabel.text = myOrder.currentOrder()
    }
    
    override func viewWillAppear(animated: Bool) {
        super.viewWillAppear(animated)
        orderLabel.text = myOrder.currentOrder()
    }
    
    override func viewDidLoad() {
        super.viewDidLoad()
        //get the reference to the shared model
        tbvc = tabBarController as! OrderTabBarController
        myOrder = tbvc.order
    }
}

43 responses to “Swift Swift: Using Tab Bar Controllers in Swift”

  1. Can we add a NavigationController into a TabController?

    I started with the post (programmatically). It works very well. I created a few ViewControllers, some on them subclass of UINavigationController, that I then assigned to a TabController.

    I wanted to add a label, or change the color in one of the UINavigationController directly with in in xib, but noticed that none of the change I made were on the view. In fact the view is black.

    When I try to do this for one of a subclass of he UIViewController, everything is fine.

    Do you have an idea about that?

    Thanks a lot.

    1. Without pouring over code, I can think of two things:
      1) you somewhere have a weak value that ARC is killing. Check your destination controllers.
      2) Xcode can’t find your xibs.

      1. I believe it is worst!
        Something probably I did not catch.
        The code in which I create the instance of a UITabBarController and then viewController are identical to your post. The only difference is for one of the controllers I use a subclass of a UINavigationController.

        In fact, when I write:

        class DestinationsViewController: UIViewController {
        override func viewDidLoad() {
        super.viewDidLoad()
        }
        }

        The view is working well (at least the backgroundcolor of the xib, ie. white).

        and when I write:

        class DestinationsViewController: UINavigationController {
        override func viewDidLoad() {
        self.navigationItem.title = “Hello”
        super.viewDidLoad()
        }
        }

        There is no title, and the backgroundcolor is black.

        In the delegate:
        let myVC1 = DestinationsViewController(nibName: “DestinationsViewController”, bundle: nil)

        I have a bad feeling with with how I call or create the navigationcontroller through the tabbarcontroller.

      2. Try putting super.viewDidLoad() first. It should always be first in a viewDidLoad. Bad idea to do anything until that gets called since you have no superviews otherwise.

        -why do you need a xib in a delegate?

        – are you using segues or pushing the view controller when you load it?

        what action is getting you to the destination controller?

  2. I made it working by using the storyboard only.
    Create a new project, chose tabbed application.
    Under storyboard, choose FirstViewController, select it then Editor/Embed in/Navigation Controller.
    It works… but I would prefer so much to do it programmatically. I dont have enough confidence in iOS to do it though UI. :-(

    1. Try putting super.viewDidLoad() first : No. Anyway the view is black.

      – are you using segues or pushing the view controller when you load it?

      This is probably because of this, I am confused. I did not used Main storyboard, I programmatically created instance of a tabbarcontroller, created the controllers, … exactly how you did in your post, except for one controller, I created it as a subclass of UUNavigationController,

      I believe i dont need segue, or perhaps do I need since one of my controller js a subclass of UUNavigationController instead of UIViewController? Why will we need a segue when we deal with UINavigationController?i think this is the point I am confused.

      1. Okay. I think I see the problem.
        1) Don’t subclass a Navigation controller, but a view controller instead. Navigation controllers are properties of view controllers. You should use them like this, where this code is in a source view controller (probably a button’s action) and TwoViewController is a subclass of UIViewController

             let vc = TwoViewController(nibName: "TwoViewController", bundle: nil)
             self.navigationController?.pushViewController(vc, animated: true) //accessing the source's navigation controller to push the destination onto the stack. 
        

        2) You are trying to do something I didn’t cover yet programmatically. In order to get the code above to work, You need to set up a root view controller as one of your tabs. To do this programmatically requires work with the appDelegate which I have not covered and will not be covering in the blog for a while. For more information on how to set up the app delegate, check Apple’s View controller catalog. Best and simplest approach is to embed one of the tab’s views as a view controller using the storyboard — or go modal.

  3. i understand the complexity now.
    i will deal with Main storyboard and create classes that I will setup to the interface. In fact, it is very easy doing that way Thanks again for your explanation.

  4. I really appreciated this very insightful iOS tab bar tutorial. However, could someone’s please help to clear up a very confusing and frustrating issue regarding selected (tapped) tab bar icons within Xcode 6.1 (with Swift code, if necessary)? At times, Apple confuses minimalism (especially with developer documentation) with simplicity. What really occurs is developer frustration, confusion, and worse—wasted time (my time)!!! I’ve been trying to figure out how to utilize Xcode 6.1’s ability to enter a selected tab bar icon (Selected Image within Tab Bar Item section). I’m using an asset catalog file (Images.xcassets) and can’t seem to locate current information (Xcode 6.x) as to how to set up a simple tab bar with selected icons. I can get all my tab bar icons to turn blue (using just non-selected icons and auto-generated alpha mask), however, when I attempt to use custom selected icons (using Xcode 6.1’s Selected Image field), the tab bar icons disappear when selected (no icon displays). Do I have to add code and if so, why did Apple even provide a field for selected icons?

    1. I’m not 100% sure what you are asking, but I think I get is one of these two:
      1) how do I put an icon on a selected tab to say it is selected?
      2) how do I change the non selected tab’s icon when it is changed to another icon.

      For possibility #1 I set up just in Interface Builder, using a pizza for a selection indicator. Here is what it looks like:
      Setup of a selected indicator with simulator running

      I think you are more after the second one, and it should work, if you stick an image in here:

      I get no image, but the debugger complains that it is a nil image both from xassets and the bundle. So this is either a bug (which wouldn’t suprise me) or we need to do this programmatically to some extent. I don’t have time right now to try it, but I will later today. Your best bet if you re in a rush is to read About Tab Bars in the UIKit User Interface Catalog Tab bar section.There is some stuff about tab bar icons and templates. click the link to templates and read that too and UIImageRenderingModeAlwaysOriginal. My guess is that is the problem, but I need to write some code to check it out.

      1. I Steven. Thanks very much for your reply and info. I was interested in the #2 (selected/tapped icon display). I get the same issue with my selected icon disappearing. I’ve read one forum on another site that suggests this icon disappearance is a bug, but I haven’t been able to confirm this. I was hoping to not have to write code (I’ve switched to Swift) for something so rudimentary and because Apple has provided a designated field for selected icons. Thanks again.

      2. I’m more than a little concerned about the nil file error that came up on the selected icon. That has me suspicious. I’ll keep digging.

      3. Just checked the developer forums. Yep its a bug. A bug report has been filed by someone already #18588205

      4. As I suspected, It does work with a single line of code in viewDidLoad for each controller in the tab bar controller.

        tabBarItem.selectedImage = UIImage(named: "pizza bar icon")?.imageWithRenderingMode(UIImageRenderingMode.AlwaysOriginal)

        Where you specify the name of the image for the selected image. That is exactly the correct line the property inspector should use to select a UIImage for selected in Interface Builder. Since this works, yep it’s a bug in Xcode, and hopefully will get fixed. In the meantime, this is a workaround. I know you wanted to avoid code in Swift, but since this is IB’s problem, Neithere Swift nor Objective-C gets a free pass on this one.

      5. Thanks so much Steven for this workaround. I’ve seen a similar workaround on stackoverflow.com, but I wanted to ensure I wasn’t missing the obvious (and that workaround applied to Xcode 5.x). It will be a helpful little capability once Apple gets it fixed. BTW, what do think about Swift?

      6. Short answer is I like Swift. As I’m writing KinderSwift, I realize one of the biggest reasons I like swift is its simplicity, though it can become incredibly powerful one you get into generics. It works great for rapid prototyping and development. I have yet to build a full application in Swift since I have been writing so many tutorials.

        I have a few problems with it. Apple keeps switching what is an optional and what isn’t. Drives me nuts, but that will eventually settle down.

        That said I’m also biased, since I’ve committed most of my waking moments promoting Swift in the hopes of selling my Book when it finally comes out. (hopefully next month)

  5. Thanks for your candor. I’m looking forward to your book. Take care.

  6. Hi there Lipton, I am in a battle trying to develop a customized TabBar App. This tutorial does it, but is there any way or are you considering in making a version using Storyboards? I am having problems with an app I am working on with 100% customized TabBar like this one: http://stackoverflow.com/questions/26770192/cant-keep-uilabel-values-displayed-while-changing-uitabbar-views?noredirect=1#comment42144174_26770192

    1. I’m not understanding what you exactly need from that stack overflow link ,since the person who wrote it was mistaking a navigationController’s sequential views to a tab parallel views. it confuses the issues. could you explain what you are trying to do a little better and I’ll see what ideas I might have.

      1. Thanks for the reply Lipton. Sure I can explain better. What I want is a complete customized Tabbed app. So since I can’t use a tabor with the height I want (taller than Apple’s default) and also custom images other than Apple’s Tabbar default, I want to have just a TabBar with my button that whenever I click on them, it changes to the corresponding ViewController. The project I am working does that , the problem as I posted at Stack Overflow is that when I go back to one of the views it creates another one instead of just going back.

        Also, I want to use just storyboard and not .xib files.

      2. 1) you can set images in tab bars. I’ll be posting a video tonight to the email list on how to do that. I saw you signed up this afternoon
        2) your problem is you trash the view with removeFromSuperview. that would be why you get 0:00. addSubview has to re create it from the start. to have true tab bar controller you need to have an array of views and associated view controllers. all of them are running at the same time, you are just showing the selected one and hiding the rest. there would be very little way to pull that off with interface builder outside of using the tab bar controller or a very large amount of work.

      3. So as for your second comment, you recommend forgetting the complete customization and adopting Apple’s TabBar template?

      4. Unless you are charging by the hour, (and you sre likely to have the client complain) yes. That is a lot of work.

      5. Ok, then, thanks for all you help. Will I be notified when you post the video you said?

      6. Yes, since you singed up for the e-list it should be in your e-mail tonight.

  7. Thanks Steven, I received by email. Also I wanna let you know that I found a Git project that did exactly what I wanted!!! I posted as an answer at StackOverflow!!! But once again, thanks for the tutorial and all your help!!!

  8. Doesn’t it seem a bit unfortunate that PieVC depends on a) PizzaVC and b) the order of view controllers in the tab bar? Seems like a better plan would be to let some other object (e.g. the app delegate) create the shared model and assign it to the view controllers that need it.

    1. That would work too. I’m always hesitant to stick anything globally if I can avoid it though.

  9. […] While Navigation controllers often have the limelight when it comes to Xcode controllers, Tab Bar controllers are great for independent tasks in the same app or for different ways of working with the same model. In this lesson, we’ll take a look at tab bar controllers and how to add them in the storyboard.  For more on implementing them in code see Swift Swift: Using Tab Bar Controllers in Swift. […]

  10. […] this programmatically from the last chapter, then change this in the appDelegate we discussed in a previous post let tabBarController = UITabBarController() to this: let tabBarController = OrderTabBarController() […]

  11. […] While Navigation controllers often have the limelight when it comes to Xcode controllers, Tab Bar controllers are great for independent tasks in the same app or for different ways of working with the same model. In this lesson, we’ll take a look at tab bar controllers and how to add them in the storyboard.  For more on implementing them in code see Swift Swift: Using Tab Bar Controllers in Swift. […]

  12. […] Swift Swift: Using Tab Bar Controllers in Swift […]

  13. […] Swift Swift: Using Tab Bar Controllers in Swift […]

  14. I’ve thank you before, but I’ll do it again. Your tutorials are excellent. Thank you for updating them for Swift 2.0 / iOS 9.

  15. […] and Cell Selection – Ray Wenderlich iOS Swift Tutorial : UICollectionView Pinterest Layout Swift Swift: Using Tab Bar Controllers in Swift | Making App Pie Introduction to Auto Layout in iOS Programming Auto Layout Tutorial in iOS 9 Part 1: Getting […]

  16. […] [折腾过程] 1.搜: swift tab view 参考: Swift Swift: Using Tab Bar Controllers in Swift | Making App Pie Tab bar for Xcode Swift for iOS – YouTube […]

  17. […] and how to add them in the storyboard.  For more on implementing them completely in code see Swift Swift: Using Tab Bar Controllers in Swift. For more on data sharing once set up in the storyboard, see Passing Data in Tab Bar […]

  18. […] 如何写tab才是标准的写法。 [折腾过程] 1.搜: swift add tab 参考: Swift Swift: Using Tab Bar Controllers in Swift | Making App Pie 搜: swift add tab bar item programmatically swift add tab view programmatically […]

Leave a comment

This site uses Akismet to reduce spam. Learn how your comment data is processed.