 In Practical Auto Layout for Xcode 8, using simple, practical, easy to follow examples, you will learn how to master auto layout and size classes on the Xcode 8 storyboard. You will learn how to make universal apps quickly easily and in far less time than ever before. You’ll learn how to use constraints the right way, how to avoid and resolve errors such as misplacements and conflicting constraints. You be able to customize your layout for both launch screens and your application, using buttons, labels, images, text fields and more.
You’ll learn more than just simple layout. You’ll earn how to use tack views and iPad multitasking. You’ll size images the right way without distortion. Practical Auto Layout for Xcode 8 covers what you need to know about multitasking on the iPad for the best user experience and how little you have to do to make this a powerful addition to your app.
Practical Auto Layout for Xcode 8 shows you how to use all these tools effectively to make layouts that work on all devices in minutes.
Links to purchase the book are in the right sidebar.
Downloads
This book has a series of downloadable projects that allow you to start each chapter with a fresh project.
The full downloads file: downloads
The images for Chapter 11 only:assets
Apple’s Documentation
The original documentation for Auto Layout is the Auto Layout Guide from Apple. As I’ve said, I think they screwed up, and made a simple topic very complicated by going into linear equations to explain Auto Layout. If you like math or what’s under the hood in Auto layout this is your document. The code is in Objective C, so Swift only developers might have some trouble with it. Apple also discusses some of the adaptive layout design issues in the Human Interface Guidelines and the View Controller Programming Guide. You might want to read about trait collections first.
Size Classes and View Controllers
This is in my opinion the most important topic to cover next. I’ll admit I’m biased, since I wrote a book on the subject Swift Swift View Controllers available now for iBooks and Coming fall 2015 for Kindle, which you find information on the downloads page. You could also read the Apple documentation on Modal View Controllers, Popovers, Alerts, Split View Controllers, and Multitasking to learn more. In rough summary, compact width presentations act like a phone and present modal views. Regular width presentations act like a tablet, and give you more options.
Coding Auto Layout
If you need to make controls programmatically, you need to use auto layout programmatically. I wrote an introduction to this topic which you can find on the makeapppie.com website. Apple discusses this a bit and has a reference to the visual format language for coding auto layout in their Auto Layout Guide. You may want to look at these classes:
Coding Size Classes
Coding for size classes is a lot more involved than the automatic version we get in Interface Builder. Critical to class sizes is Trait Collections, which describes size classes programmatically. Here is the Class and protocol you need for Trait collections:
Practice What You Learned
The best thing you can do is practice. To save you from having to think out a layout, go to graphic design gallery sites like Behance or Pinterest and try to layout out someone else’s design for all devices. If you have trouble finding examples, I curate on Pinterest for devices that I find interesting. You can find that at https://www.pinterest.com/stevenlipton/cool-ui/
Video Examples
This book is based on a series of YouTube Videos I did in Fall of 2014. If you want to see a live action version of what I did back then, you can go to the playlist to watch the videos I did for the first few chapters. They don’t completely match the book, but they are close. More tutorials will be coming in the future.
Errata
A tech author’s work is never done. As soon as he or she completes manuscript and gets it published, the manuscript almost immediately becomes obsolete. In my case, Practical Autolayout for Xcode 8 went obsolete a day before I published, but I had no idea about a major change in Xcode 8.1.
Until Xcode 8.1, if you wanted to update a frame with new constraints, you had two possibilities. The first was in the pin![]() and align
and align ![]() menu to update as you were setting the constraints.
menu to update as you were setting the constraints.
The second was a selection in the resolver ![]()

It seems everyone, including me was not ready for a change Apple made in Xcode 8.1. If you go to look for Update Frames in the resolver ![]() , it is missing:
, it is missing:
So where did it go?
Apple moved this to an icon on the auto layout toolbar and deleted it from the menus.
If it were me, I wouldn’t have deleted it from the menus in such an abrupt way. Apple did. This Update Frame button has some different behaviors from its predecessor on the menu, and I’d like to explain that using some examples from Chapter 3 of Practical Autolayout for Xcode 8
Set up a storyboard that looks something like this with a label Hello Pizza, a text view, and three buttons, Pepperoni, Cheese, and Done:
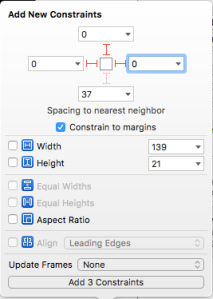
Select the Hello Pizza label. Click the pin button![]() in the auto layout toolbar. In the popup, set the top to 0 points, the left to 0 points and the left to 0 points. Leave Update Frames as None
in the auto layout toolbar. In the popup, set the top to 0 points, the left to 0 points and the left to 0 points. Leave Update Frames as None
Add the 3 constraints. The Hello Pizza Label will show misplacement constraints.
Press the Update Frames button ![]() and the frame updates.
and the frame updates.
This is not always the result. You must have all constraints satisfied before the button will update frames. For example, select the text view. Press the align button ![]() and center the text view by checking on Horizontally in Container and Vertically in Container.
and center the text view by checking on Horizontally in Container and Vertically in Container.
Again don’t update frames, but click Add 2 constraints. You’ll see an ambiguous constraint in red.
If you click the ![]() button nothing happens. Until a frame has no ambiguity(i.e. no red constraint errors), you cannot update it. Most often that is setting a size. For the text box, set an absolute size in the pin menu
button nothing happens. Until a frame has no ambiguity(i.e. no red constraint errors), you cannot update it. Most often that is setting a size. For the text box, set an absolute size in the pin menu ![]() of 175 points in both directions.
of 175 points in both directions.
Add the constraints. The errors all turn to misplacements.
Once all misplacements, you can update the frame with ![]() .
.
Priorities are not assumed with the new update frames button. When there is an ambiguity in size between two frames that depend on each other for size, you must specify the a priority for them or set a size. Take for example these two buttons.
Pepperoni is pinned to the left margin, the label above it and the text view below it. Cheese is pinned 10 points from Pepperoni, aligned to the top of Pepperoni, and pinned 10 points from the right margin. We’d like to have two buttons that fill the available space.
The option used in Practical Auto Layout for these buttons is to make them the same size. Control drag from Pepperoni to Cheese. A menu appears.
Shift select Equal Width and Equal Heights, then hit the Add Constraints selection. The ambiguity changes to misplacements.
Select both the Pepperoni and Cheese buttons. Hit the Update Frame button ![]() and two equally sized buttons appear
and two equally sized buttons appear
The other, more advanced option is to change priority of one of the buttons so they are not equal. Both are by default 250. Going back to the original ambiguous layout,
changing the content hugging priority of Pepperoni from 250 to 251 tells auto layout for Pepperoni to keep its size and Cheese to stretch to make up the difference.
Priorities are covered in detail in Chapter 12 of Practical Autolayout for Xcode 8.
I’ll be updating the book shortly. Until then or if you cannot update your book, consider this an errata to the versions now available.


