Make App Pie

Training for Developers and Artists

The Swift Swift Tutorial: Using Segues and Delegates in Navigation Controllers (Part 1 — The Template)

[Updating to Swift 2.0  SJL 9/17/15]

Click here for the Swift 3.0 version of this post
It should be one of the easiest things we do, and yet for many it is the most confusing. Getting data from one view controller to another as you switch views never seems easy. Segues might be slightly difficult, but delegates to get the information back have given many a developer a headache or two. Swift does streamline the process a bit, but much of the setup is the same as Objective-C. Today we’ll discuss this often used technique.
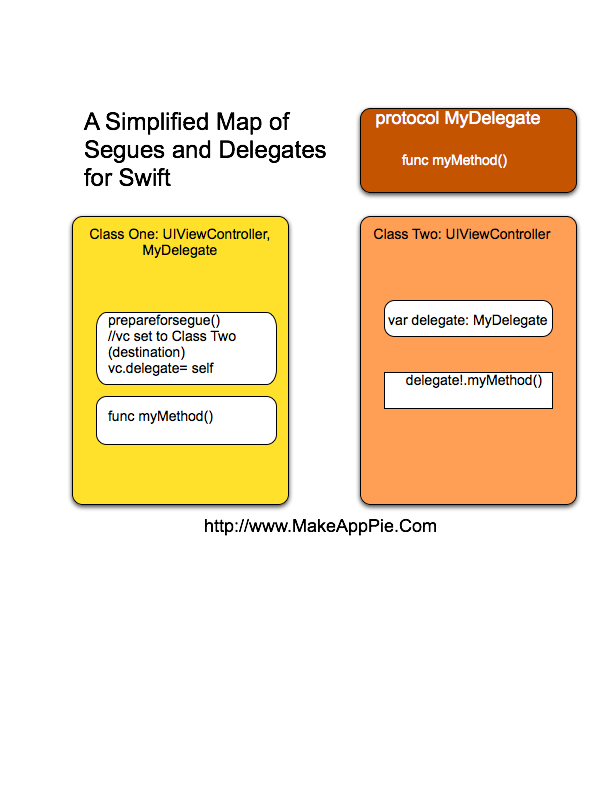
A basic map of Segues and Delegates for UI

As this can get a bit convoluted, I decided to break this topic down into two posts. This post will make a new very tiny app which is nothing but a segue, a delegate, and a few controls to prove they work. The next post we will add all this to the pizza demo app, and discuss more practical issues with using delegates. For those looking for factory delegates, we’ll discuss that in two posts from now when I discuss something that uses a lot of them: UITableViews.

Make a New App

The First Scene

Make a new single-view Swift project named Swift2DelegateFoo. In the storyboard click on the view controller, and embed it in a navigation controller by selecting Editor>Embed In> Navigation Controller. Add a label in the center of the view, centered and with the text Unknown Color. Drag a bar button item to the right side of the navigation bar. Change its title to Color. It should look something like this.

2015-09-17_08-00-36

In the view controller, remove everything but the viewDidLoad() method. Using the assistant editor, connect an outlet for the UILabel called colorLabel. Your code should look like this:

 import UIKit

class ViewController: UIViewController {
    @IBOutlet var colorLabel : UILabel!
    override func viewDidLoad() {
        super.viewDidLoad()
        // Do any additional setup after loading the view, typically from a nib.
    }
}

The Second Scene

Make a new Cocoa Touch class that subclasses UIViewController from File>New>File…. Call it FooTwoViewController. In the code, remove everything but the viewDidLoad() method.

Go back to the storyboard and drag in another View controller. From the Foo One Navigation bar, control-drag the Color bar button item to the new controller to connect the segue. Set the segue to show and in the property inspector set the identifier to mySegue. Select the new view controller again in the storyboard. Once we’ve set the segue, in the identity inspector set the custom class for this view controller to be FooTwoViewController.

Now we’ll add a label, a navigation item, a bar button item, and three buttons. First add the label and place it towards the center of the view. Make the label the width of the view. Place the three buttons under the label. Title the buttons Red, Green and Blue respectively. Drag a navigation item into the view and in the label, title it Foo Two. Finally add the bar button item to the navigation bar. Your finished view should look like this:

2015-09-17_08-07-39

Open the assistant editor if not already open. Control-drag the label into the FooTwoViewController class. Create an outlet named colorLabel. Select the bar button, and control-drag it to the class code.  Make an action named saveColor. Select the red, green and blue buttons, and control drag them into FooTwoViewController. Make an action for a UIButton called colorSelectionButton. In the colorSelectionButton method add this code:

colorLabel.text = sender.titleLabel!.text!

Above the colorLabel outlet add a string variable colorString:

var colorString = ""

Finally, add this to viewDidLoad() to set the label correctly from the property:

colorLabel.text = colorString

Your code for FooTwoViewController should look like this:

import UIKit

class FooTwoViewController: UIViewController {
    var colorString = ""
    @IBOutlet var colorLabel : UILabel!

    @IBAction func saveColor(sender : UIBarButtonItem) {
    }

    @IBAction func colorSelectionButton(sender: UIButton) {
         colorLabel.text = sender.titleLabel!.text!
    }
    override func viewDidLoad() {
        super.viewDidLoad()
        // Do any additional setup after loading the view.
        colorLabel.text = colorString
    }
}

Build and Run. Go back and forth between the two views.

Adding prepareForSegue

To move data from Foo One to Foo Two, we will override prepareForSegue(). Overridden methods in the editor are a bit tricky at first, since the auto fill-in has a new feature. In Swift a method that is overridden starts with the keyword override, as you can see with the viewDidload method above. However when typing in any defined method getting overridden, you don’t start by typing override. Instead you type the function or method name and Xcode adds override func to it. Go into the viewController.swift file and under the viewdidload method but before the end of the class, type prepareforS. Xcode will automatically populate the rest for you. Press tab, or click the selection on the drop down. Add braces to the end so you have this:

override func prepareForSegue(segue: UIStoryboardSegue, sender: AnyObject!) {
    }

Add the following code to this method so the prepareForSegue() reads:

override func prepareForSegue(segue: UIStoryboardSegue, sender: AnyObject!) {
        if segue.identifier == "mySegue"{
            let vc = segue.destinationViewController as! FooTwoViewController
            vc.colorString = colorLabel.text
        }
    }

In line 1, the first parameter is segue, which is a UIStoryboardSegue object. This is the segue we call for our transition between controllers. The exclamation point means that it is not an optional value, and we can use it as is (see below for more on optional values). In line 2 we check to see if this is the correct segue. Line 3 we create vc which is the pointer to the segue’s destination view controller. destinationviewcontroller is of type AnyObject! a Swift equivalent to Objective-C’s id. We need to cast, or more technically downcast to the correct object type with the as operator, and make vc an instance of FooTwoController. Once we do that, we can access the colorString property in line 4, sending our current text to the property in the new controller.

Build and Run. We now can send “Unknown Color” to the new controller.

The segue working correctly

Now comes the slightly more challenging part: getting stuff back. For that we will need a delegate.

Protocols and Delegates in Swift

Like Objective-C, delegation uses protocols. Protocols for those who are not familiar are properties and methods that while declared in one place, another class implements. They allow for a layer of abstraction. A class adopts a protocol to do something. The protocol defines what the something is.  The adopting class will have the code how it gets done.

We are going to set up a protocol to dismiss the Foo Two controller, and then adopt it in the main view controller. This way we can indirectly access properties of the Foo Two controller. Such an access is a delegate. In the Foo Two controller above the class definition for FooTwoViewController, add the following:

protocol FooTwoViewControllerDelegate{
    func myVCDidFinish(controller:FooTwoViewController,text:String)
}

This sets up the protocol FooTwoViewControllerDelegate with a required method myVCDidFinish(). I used a incredibly generic name here, you can of course make it more specific for readability. Next, in the FooTwoViewController class, add the following just after the class definition:

var delegate:FooTwoViewControllerDelegate? = nil

We define a delegate of optional type FooTwoViewControllerDelegate and set its value to nil. Although I covered optional values last time, they are so important I’ll review this important part of Swift. We are familiar with simple values such as a Double or Int. If we want a state for any object that has a nil state, we use an optional value. Declare an optional with a question mark after the type, as it is above. An Optional value of a Double? can be nil, along with any number for example. There is a cost to this extra power. To get back that number you have to unwrap the optional value with the ! operator. The ! operator will return a value as long as the optional is non-nil. If nil, it will break program execution with a run-time error. Before using a ! operator almost always check for nil. For example, add the last part of our code to the saveColor method:

    @IBAction func saveColor(sender : UIBarButtonItem) {
        if (delegate != nil) {
            delegate!.myVCDidFinish(self, text: colorLabel!.text!)
        }
    }

The if statement in line 2 tests an optional for nil. In the code above we first test our delegate, then unwrap the delegate to use the myVCDidFinish method. As a protocol, it isn’t defined here. The adopting class defines it, so our next stop is adopting the protocol back at the original view controller.

Open the ViewController.swift file. Change the class definition to:

class ViewController: UIViewController,FooTwoViewControllerDelegate

You should immeiately get the expected error:
Type ViewController does not conform to protocol FooTwoViewControllerDelegate
We need to write the protocol. On a blank line just above prepareForSegue(), start typing myVCDidFinish until auto complete finds it, press tab, add braces and the rest of this:

func myVCDidFinish(controller: FooTwoViewController, text: String) {
        colorLabel.text = "The Color is " +  text
        controller.navigationController?.popViewControllerAnimated(true)
    }

We take the value of text and place it in our label. We then use the controller to dismiss the controller with popViewControllerAnimated. Note that in Swift, there is no YES and NO but true and false for Boolean values.

We need to set up the delegate in the segue. Add to prepareForSegue(), just under colorString = colorLabel.text:

vc.delegate = self

Build and run. You should be able to send “unknown” to Foo Two. Click a color and send the color back.

Segue and Delegate working properly.

This is the basic segue and delegate template, which you can try to use on your own projects. Next time We’ll add it to the Pizza Demo app and edit the dictionary.

If you are not uderstand what we did here, you might need a little help with a few few concepts of delegation.  this is mostly how, not why. For the why,  read Why Do We Need Delegates

The Whole Code

Here is the code for the viewController.swift and FooTwoViewController so you can see everything in context.

//
//  ViewController.swift
//  Swift2DelegateFoo
//
//  Created by Steven Lipton on 6/29/14.
//  Copyright (c) 2014 Steven Lipton. All rights reserved.
// Updated 9/17/15 SJL for Swift 2.0

import UIKit

class ViewController: UIViewController,FooTwoViewControllerDelegate {
    @IBOutlet var colorLabel : UILabel!
    override func viewDidLoad() {
        super.viewDidLoad()
        // Do any additional setup after loading the view, typically from a nib.
    }
    func myVCDidFinish(controller: FooTwoViewController, text: String) {
        colorLabel.text = "The Color is " +  text
        controller.navigationController?.popViewControllerAnimated(true)
    }
    override func prepareForSegue(segue: UIStoryboardSegue, sender: AnyObject!) {
        if segue.identifier == "mySegue"{
            let vc = segue.destinationViewController as! FooTwoViewController
            vc.colorString = colorLabel.text!
            vc.delegate = self
        }
    }
}
//
//  FooTwoViewController.swift
//  Swift2DelegateFoo
//
//  Created by Steven Lipton on 6/29/14.
//  Copyright (c) 2014 Steven Lipton. All rights reserved.
// updated 9/17/15 SJL for Swift 2.0

import UIKit

protocol FooTwoViewControllerDelegate{
    func myVCDidFinish(controller:FooTwoViewController,text:String)
}

class FooTwoViewController: UIViewController {
    var delegate:FooTwoViewControllerDelegate? = nil
    var colorString = ""
    @IBOutlet var colorLabel : UILabel!

    @IBAction func saveColor(sender : UIBarButtonItem) {
        if (delegate != nil) {
            delegate!.myVCDidFinish(self, text: colorLabel!.text!)
        }
    }

    @IBAction func colorSelectionButton(sender: UIButton) {
         colorLabel.text = sender.titleLabel!.text!
    }

    override func viewDidLoad() {
        super.viewDidLoad()
        // Do any additional setup after loading the view.
        colorLabel.text = colorString
    }
}
80 responses to “The Swift Swift Tutorial: Using Segues and Delegates in Navigation Controllers (Part 1 — The Template)”

  1. Hi I am having problems getting values form my segue when going from a tableview controller to a view controller. They keep coming up nil. I was successful in gettign values by going from a tableviecontroller to tableviewcontroller

    1. I’ll be working on that this weekend. Should have the pizza demo segues post done and out by Saturday, and will plan for early next week to go through table view controllers in detail.

    2. Shai,
      What does your prepareForSegue() look like for passing from table view controller to table view controller and for the table view controller to a view controller?

  2. Hi,

    Why does the IBAction for the colorButton appear in the 2nd view controller code, when the button itself is in the 1st one?

    1. Good question, and the answer is I should have named things a bit clearer. The Color bar button on Foo One does not have a target action directly. It is just a segue. The actions from pressing this button will occur in the overridden method prepareForSegue() as part of the sequence the code follows when opening Foo Two. To be more technically accurate, prepareForSegue() gets called for any segue and we have to check to see if it is the the segue we want to do something about through the segue identifier. The IBAction on Foo Two I really should have named colorSelectionButton or something like it to be clearer. It is wired up to the buttons labeled Red, Green and Blue. I’ll make that change. Good catch Rob.

  3. Hi great Tutorial, under the “The Second Scene” Paragraph i think you missed to add “colorLabel.text = colorString” under the viewDidLoad() method. Because i could not get the “unknown Color” in the SecondViewController without adding it!!

    1. You are correct. It’s already in The Whole Code but somehow didn’t get into the text itself. I’ll change that right now.

      1. I have not read the whole Tutorial yet, but i really enjoy it. Keep up the good work :-)

      2. Thanks! Enjoy. Table views are almost done and should be out tomorrow or Wednesday.

    2. Done! Thanks for the catch!!

  4. Can’t you just use Optional Chaining to avoid checking for nil?
    delegate?.myVCDidFinish(self, text: colorLabel.text)

    1. I don’t see why not. Works fine in my code. I haven’t covered that yet, but it sounds like you read the whole Swift book, so go for it.

  5. Very happy to have chanced on your tutorial. I was able to successfully complete this and really understand Segues and Protocals in a clear fashion. You are very succinct, to the point..Thanks very much

    1. You are very welcome. Lots of good new tutorials should be coming out soon.

  6. Thanks for the tutorial, it works perfectly. Just one slightly critical question though: why use protocols and delegates, instead of directly sending a variable from one class to the other? For example, in javascript I always use:

    showScreen(2, “test”)

    This will instantiate an instance of screen 2 and send the variable “test” to it. Why is this so complicated in Swift? (Wasn’t swift supposed to make programming apps easier than in Objective C?)

    1. Very good question!! I’d have to write an entire blog post to answer that fully but the short answer is 1) The Model-View-Controller pattern is a bit tight about what you can put where. 2)Yes, if you call a new view controller you can put things into it, in our case through prepareForSegue so it goes to the right place. 3) The reason we need a delegate is that view controller we called can’t send anything back to the caller. So the protocol and delegate is a sneaky way of doing it without breaking MVC. There is another way, which I’ll be writing a blog post about sometime soon: notifications.

    2. Well Chriet, I went and wrote the long answer if you are interested in the whole story of delegates and why you need them. http://wp.me/p2kbUU-fj

  7. Israel M. Bravo Avatar
    Israel M. Bravo

    Which is the best way to manage 2 or more view controllers for one button? In other words, can I decide to which view controller depending of several variables the button must be redirect the navigation? Is this possible to do this?

    1. Good question. I’d have to write a full blog post to to go through all of this, and I’ll include it when I talk about going betweennavigation View controllers programmatically. The quick answr is to make segues from one view controller with the button (not the button itself) to two different view controllers. you can then use and if.else statement and the performSegueWithIdentifer method. I’ll write an example a bit later for you.

      1. Example. Suppose you use a UISwitch named blueGraySwitch, you could set your IBAction for the button to:

        @IBAction func GotoViewController(sender: AnyObject) {
        if blueGraySwitch.on {
        performSegueWithIdentifier(“BlueSegue”, sender: self)
        } else {
        performSegueWithIdentifier(“GraySegue”, sender: self)
        }
        }

        Assuming you set up two segues from the source view controller to the two destinations, named BlueSegue and GraySegue, this works fine.

      2. Israel M. Bravo Avatar
        Israel M. Bravo

        Thanks Steven … I’m going to try it … I’ll keep you informed

  8. Thanks for great tutorial about Swift

  9. […] of  organizing view controllers. I’ve covered much of their use in other posts about MVC, segues and delegates. In this chapter, We’ll go through some of the Swift code for the Navigation […]

  10. When I replicate everything above, nothing happens when I press the save button (saveColor) on the Foo Two view controller. Am I missing something?

    1. The most common mistake is not set the FooTwoController.delegate property correctly in Foo One’s prepareForSegue. One trick to make sure you did this is use this code instead of what I wrote above:

      @IBAction func saveColor(sender : UIBarButtonItem) {
          delegate!.myVCDidFinish(self, text: colorLabel!.text!)
      }
      

      by leaving out the if, you are sure to crash if you did not set it. If it crashes with a nil can’t be unwrapped, you forgot

      vc.delegate = self
      

      in prepareForSegue. Other than that check to see if you adopted the protocol in the class declaration for Foo One.

      class ViewController: UIViewController,FooTwoViewControllerDelegate {
      
  11. First thing I tried was to leave out the if. It wasn’t the issue, it didn’t crash. However, it doesn’t go back to the viewcontroller. Nothing happens. When I go home I’ll check everything again.

    1. If it is not the delegate call, make sure you are adopting the protocol would be the next thing I try.

      Also make sure you hooked up the button by adding print ("hello Delegate!!') to the button’s handler above the delegate call. or go into the storyboard, open the assistant editor, and hover(don’t click) over the circle to the left of the handler. The button should highlight if it is hooked up as an action.

  12. I never embedded the view in a navigation controller. Now I feel really stupid.
    One thing though, in the PrepareForSegue function Xcode 6 gm gives an error on line vc.colorString = colorLabel.text unless you add a “!” at the end.

    Is there a way to use segues without a navigation controller?

    1. I’ll fix that – missed one. Just so you know, the text property in UIlabeles is a String? type. Been driving me nuts since Beta 7 fixing them all.

      You can use modals with segues. See my post on that at http://wp.me/p2kbUU-hL

  13. Thanks for the tutorial, it was great!!, What if I want to perform the segue from the Foo One to Foo Two but I want to do it programmatically? i.e., without dragging the bar button item from one view controller to another but creating a “performSegue()” function that does that when I press the bar button?

    1. Good question!!! It’s so good a question that I even wrote a whole post about it, which you can read here: https://makeapppie.com/2014/09/15/swift-swift-programmatic-navigation-view-controllers-in-swift/

      The short answer is yes, you can do that, and as I discuss in that article, there are times when you need some logic behind your choice of what segue to use, and performSegueWithIndentifier() is the best way to do that.

  14. Hi, great tutorial!!, I am I have a doubt, Why move data between views if I could use global variables? is there advantage to perform prepareForSegue method?

    1. The simple answer to another good question is global variables do not promote modular code. Globals also are VERY dangerous since literally anything and anybody can change them, and you cannot control that or even know who or what did (and I mean both from a security standpoint and a programming point). I address this more in my post Why Do We Need Delegates?

  15. I have missed something. I have gone back over the code and I just don’t see it. I am at the point of testing just prior to installing the delegate. ETimm’s comment that he forgot to embed the view in the Navigation Controller makes me think that I missed a step but I just don’t see it. When I click on “color” button bar item the segue executes, but when I try to go back by clicking on “save” nothing happens. If I select a color (button) the label changes to reflect that.

    So in the case that I have to somehow identify the view of the second view controller to the navigation bar is there a way to do that now? Thank you.

    1. From the way you describe things the done button shouldn’t work at the stage you are at. If you haven’t fully set up the delegate yet, the Done button of FooTwoViewController should do nothing. There is no code in it yet and the way it works is the delegate. If that is the case, this is what the saveColor should look like:

      @IBAction func saveColor(sender : UIBarButtonItem) {
      }
      

      Which means it is not doing anything when pressed. We set up code for this action in the delegate part. If you did have code there, and you have no syntax errors any where. there is two possible suggestions to check:
      1) In prepareForSegue did you include vc.delegate = self ? like this:

      override func prepareForSegue(segue: UIStoryboardSegue, sender: AnyObject!) {
              if segue.identifier == "mySegue"{
                  let vc = segue.destinationViewController as FooTwoViewController
                  vc.colorString = colorLabel.text
                  vc.delegate = self    // <------Must have this line to work
              }
          }

      If not here, the delegate will not work at all but look like everything is fine. The dismissViewController code is in the delegate, so it won’t dismiss.
      2) Is the bar button not wired up for some reason? right click on the Done bar button item and check if it has a connection. If not control-drag it into the code using the assistant editor and make it an action called saveColor as shown above.

      Overall what I’m saying is don’t worry about it until you have implemented the delegate. if it still doesn’t work, then you need to do some testing.

      1. Thank you. What threw me off was at the point where I stopped you show an a working example that is executing the segue when “color” is tapped in vc and returning when “save” is tapped in vc2, followed by the words: “Now comes the slightly more challenging part: getting stuff back. For that we will need a delegate.” I suspect that the root cause of my confusion has to do with frequent beta releases of swift: a.k.a user testing.

        I am excited about swift even though my head is still spinning from trying to learn objective-c which kept growing and changing before I could master it. It is my hope that swift will simplify coding by abstracting the fussy details.

  16. Steve, an almost completely unrelated reply: I am trying to create a game which is 80% chained animations and 15% user responses. The problem is that the code runs ahead of the animations, changes destinations in flight and runs ahead again. I was thinking that if I put graphic segments in segues maybe I could force chain completion before leaving the segue in the last completion. Will this work? Is there a better way to gate chained animation? BTW The view, the gameboard looks and feels the same in each segue, I am only intending to use the segues as a means of stopping the main thread while the animations catch up to the code. I don’t even know if the way I am explaining it makes sense.

    HELLO? Anybody!
    (Don’t panic Sid. There is air moving. Got to be away out of here…) Damn. I should have brought matches…

    1. Segues would be an inefficient hack. What you need is observers which is considered an alternative to sending data via delegates or the use of completion handlers, if not both. Don’t think I have posted anything about either on the blog.

      So one strategy is run one part in modal cotrollers and you will notice that if you present or dismiss them programmatically there is a parameter completion which takes a block of code as a parameter — in my examples it is always nil, but it can take an block of code. Completion handlers run code only after the operation that called them happens. so dismiss the modal, and then in the completion handler, present the next part or set a flag that an observer know it can start up.
      On a different track, if i’m in sprite kit i use flags a lot to notify the game loop what should or should not be happening. set a flag for the code to not run while an animation is running so it is the only thing that can be done. There are many ways to do this, form just assigning a bool to a valur you turn on and off to Swifts property observers, to the big daddy of them all Key-Value observing. I don’t have a lot written up about those, though there is some about property observers in the e-book and in apple’s Swift e-book as well.

      1. Thank you for your help above and beyond the call. -Sid Wyckoff

  17. Hey There, I really enjoyed the tutorial but I only get unknown color when i press save. I’ve looked over it many times and I can’t figure out what I did wrong. I followed your to better follow the issue and my simulator crashed i can’t find any issues there though, take a look : override func prepareForSegue(segue: UIStoryboardSegue, sender: AnyObject!) {
    if segue.identifier == “mySegue”{
    let vc = segue.destinationViewController as FooTwoViewController
    vc.ColorString = ColorLabel.text!
    vc.delegate = self
    }
    }

    I am aware i use capitals.

    1. The capitals could be your problem. swift is cranky about the Differences between Types/classess and everything else.

      1. If this were the case I would receive errors and i don’t have any besides if I change that line to any other ideas?

      2. Not necessarily would you get a syntax error. You are getting a run time error. Check the capitalization again and in particular chack the connections to the outlet. Right click the label and make sure the label has the same identifier as the outlet. For example

        should match

         @IBOutlet var colorLabel : UILabel!

        If they don’t or the button doesn’t you would get a crash and/or no information passing back and forth.

        Beyond that, There not much more I can do. I recreated the whole app and I could find nothing wrong.

  18. Hey there! I followed your tutorial and enjoyed it. I am stuck though my label stays to unknown color. I followed your and my simulator crashed. I tried to find my issue there but no success, could u take a look? override func prepareForSegue(segue: UIStoryboardSegue, sender: AnyObject!) {
    if segue.identifier == “mySegue”{
    let vc = segue.destinationViewController as FooTwoViewController
    vc.ColorString = ColorLabel.text!
    vc.delegate = self
    }
    }

    I am aware of Capitalization.

  19. Wouldn’t let me reply on last message.
    For me ColorLabel is connected to Foo Two which is the title of navigation bar, and it doesn’t say “The Color is:”. It says Unknown Color

  20. Love your posts, thanx for all the help

  21. Hi, nice tutorial on a subject that all noobs, like myself, I guess have to go through. Thanks.

    I’d like to know if there is a reason why I couldn’t add the buttons to FooTwoVC. I ended up having to add a Navigation Controller, but then the segue didn’t lead into FooTwoVC anymore. Hence, i had to change the inside of the prepareForSegue if statement to this:

    if segue.identifier == “mySegue”{
    let navigationController = segue.destinationViewController as UINavigationController
    let vc = navigationController.viewControllers[0] as TwoViewController
    vc.colorString = colorLabel.text!
    }

    1. Correction – I couldn’t add the ‘bar buttons’ in the Navigation bar.

      1. Continuing the same issue – I think that the additional Navigation Controller on FooTwoVC is preventing the line – controller.navigationController?.popViewControllerAnimated(true) from dismissing FooTwoVC. Do you know what I would need to change this to get it to remove controller?

        I know the delegate method is working, because when I press the back button, the label has become “the colour is red”.

    2. I’ll have an answer for you in a little bit. Got a bit bogged down here getting the next video out. In the meantime, Make sure you embedded the view controller in foo one. I’m aware the bar buttons are a little cranky. Try dragging a UIBarItem first (which ends up looking like a label) onto the navigation bar and then the bar button item.

      good workaround though. The code I wrote should work though, and I try to avoiding using anything absolute if I can.

      1. That answer is fine. Strangest thing, following our advice, I deleted the Nav Controller, and the navigation menu on the TwoViewController was not deleted. This meant, I could simply reconnect the views with a segue, and re-implement everything as you so well described, and voila!

        If anyone has trouble putting the bar buttons into the TwoViewController, your suggestion to add a UIBarItem is probably the best approach. Like most of my work arounds, using a second nav controller hit a problem that I’ve no idea how to solve.

        Thanks again.

      2. For some reason a pristine view controller dragged out will only put a bar button item on the button toolbar, until you put a navigation item on the area for the navigation bar.

        Yes, the problem with your workaround is messing with the navigation stack gets very messy very fast.
        Glad this got solved.

  22. Hi,
    Maybe someone can help me out.

    I always get EXC_BAD_ACCESS code 2
    Apparently the vc.colorString = colorLabel.text! seems to be the problem.

    Here is the complete code of the VC

    class ViewController: UIViewController {

    @IBOutlet var colorLabelOne: UILabel!

    override func viewDidLoad() {
    super.viewDidLoad()
    // Do any additional setup after loading the view, typically from a nib.
    }

    override func didReceiveMemoryWarning() {
    super.didReceiveMemoryWarning()
    // Dispose of any resources that can be recreated.
    }

    override func prepareForSegue(segue: UIStoryboardSegue, sender: AnyObject?) {
    if segue.identifier == “mySegue” {
    let vc = segue.destinationViewController as FooTwo

    vc.colorString = self.colorLabelOne.text!
    }
    }

    Thanks!

  23. the content in second foo two does not show when i press the color button !any help

    1. Check if you assigned the delegate correctly.

  24. Hi Steven,

    Thank you for the tutorial! I ran into a problem. My IBAction method for the color buttons isn’t working. It is connected, but I put a breakpoint in it and it isn’t called. I created a test button in the first screen and it works fine. I created another test button in the second screen and again it’s not working. The bar button in the second screen works fine. Do you know what could be wrong? Thanks!

    1. first thing I’d do is check the connection again by right clicking the button in the storyboard just to make sure it is connected to the right place.

  25. […] our last post, we went through a very basic framework for segues and delegates in Swift. This time, we will add […]

  26. Awesome Tutorial. I’m new to swift and this tutorial cleared a lot things for me. I would like to know 2 things:

    1) What is “self” pointing to in this piece of code?
    “vc.delegate = self”
    Is it pointing to “ViewController” (i.e the Parent) ?

    2) There is a segue attribute called “sourceViewController”. Couldn’t that be used somehow to pass data back to the Parent?

    1. 1) yes, self is ViewController in this case. the property delegate points to ViewController so in the destination controller we can run the protocol property defined there.
      2) encapsulation means that the destination view controller does not know about the segue. it has zero idea how you got there . the segues’ properties only work in the source view controller using it to present the destination, which usually is a prepareForSegue.

      Take a look at my article Why do we need delegates to get a better explanation.

  27. You explained it perfectly..

  28. This was ENORMOUSLY helpful to me. A thousand thank yous!

  29. […] I’ve written two posts on that subject. Take a look at Why Do We Need Delegates and Using Segues and Delegates in Navigation controllers for more on […]

  30. […] which we now have to set up. If you are not familiar with delegates you may want to review here and here. Start by declaring the protocol above the AddRowInterfaceController […]

  31. […] The Swift Swift Tutorial: Using Segues and Delegates in Navigation Controllers (Part 1 — The T… […]

  32. […] not worked with delegates I suggest you look at these two delegate posts to help you understand: Using Segues and Delegates in Navigation Controllers and Why Do We Need […]

  33. Hey. Thank you for this tuto. I understand how to setup a protocol to send data through views. I just don’t understand why we have to you this method to send back data and not setup an other segue to the other side from 2 to 1 ?

    1. Every segue creates a new view controller instance, so you are not going back, but sending data to a clone of your original. This kills your memory. There’s a lot longer explanation which you can find here: https://makeapppie.com/2014/08/04/the-swift-swift-tutorial-why-do-we-need-delegates/. It will explain what’s going on under the hood for delegation, and why you have to do it. YOu can alo refrence my Book Swift Swift View Controllers for an explanation.

  34. if you added some screenshot it will be easy for a new comer. I spent lot of time to understand this. However i did it, but was very difficult.

    1. It is a very difficult concept. If you are new and got it on the first shot, you deserve a pat on the back. I’ll be updating this for Swift 3.0 shortly with new screenshots, but the main parts of this happens in code, it is not Interface Builder related so there is little to see.

  35. Thanks for the tutorial! When I press the ‘save’ button, however, it does not go back to the original view controller. I have read all the comments and my view is embedded in the navigation controller, in prepareForSegue i have vc.delegate = self, and all other troubleshooting methods don’t seem to help.
    — My question is what changes the delegate? We set it to nil when we initialize the variable, and then the saveColor method is called when I press the button, but since delegate still equals nil, it is not falling into the if loop. Should there be a line in saveColor or in colorSelectionButton that changes the delegate to something other than nil before that if statement?
    Thanks!

    1. Make sure you assigned the segue the correct identifier in the storyboard. If you got all the code right, it may not be firing the code in your segue because it doesn’t know to fire. You can check that by setting a breakpoint o on the vc.delegate = self line or a print("In segue") just before that statement. If the code breaks there or you get that message in the console, it is are working correctly, but I’m betting it won’t. I’ll answer your other question on your other comment.

  36. The identifier of the segue identifier wasn’t correct. Everything works, thanks!

  37. George Brandes Avatar
    George Brandes

    Steve
    Great piece but in the text portion could you please fix this line in the text
    1 var colorString = “”
    in Swift 2 app doesn’t work unless that line is changed to
    var colorString:String = “”
    A couple of lines down it needs to be fixed again.
    It is correct where all the code is shown.
    Also, I couldn’t get the nav bar to work unless the foo two was embedded in a nav controller.
    Thanks for all your work.

    1. This code was checked for Swift 2.0 as I noted in the very first line of the post. The code
      var colorString = ""
      is correct(even works in 3.0 BTW). Implicit typing is one of the fundamental features of Swift, where we do not have to declare the type. It’s okay if you do as you did here, but it is not necessary. Given your comment has the wrong quote characters in it, I’m wondering if that is the cause.
      I take that back about the quotes, that’s WordPress’ fault. Check if you havs a space between that quotes and the equal sign.
      FooTwo is embedded in a Navigation controller because FooOne must be embedded in a navigation controller. If Foo One is embedded in a navigation controller and you connect the storyboard in foo two, foo two is now part of that view controller stack. Both of those steps are in the narrative.

  38. […] Source: The Swift Swift Tutorial: Using Segues and Delegates in Navigation Controllers (Part 1 — The T… […]

Leave a comment

This site uses Akismet to reduce spam. Learn how your comment data is processed.