

In last week’s tutorial of this series, we made a simple dynamic table for the Apple Watch and demonstrated static scrolling tables.Based on some running pace data, we displayed the pace I ran at the mile splits. Many apps will need more than what we discussed. Apps might navigate from the table, insert and delete entries and select entries. In this lesson we’ll also introduce menus and text input.
Make a New Project
We’ll review what we did in the basic tables lesson by rebuilding the application with a few changes. If you built that app, you can modify it and save yourself some time. Along the way I’ll We’ll leave out some of the explanation this time, so if you want more clarification go to the last lesson. Make a new project using the WatchOS application template iOS App with WatchOS App Name the project SwiftWatchOS2TableDemo, with Swift as the language and Universal for the device, clicking off Include Notification Scene. Save the project. Start your watch and phone simulators to get them ready to run.
Add Your Controls
On the Interface.storyboard, add two buttons and a label. Make the button backgrounds Medium Blue(#8080FF). Title the top button Bottom and the bottom button Top.

In the object catalog, find the table object.

Drag the table object to the interface in the storyboard, inserting it between the two buttons. A group called Table Row appears.

Add two labels to the bottom of the watch interface. The interface will expand as you add them in. Make their text look like this

Open the document outline to look at the structure of a table object:

Click on the Table Row Controller in the document outline. Row controllers need unique names in the table. In the attribute inspector, make the identifier row

Click the group for the row controller. By default, this group is horizontal. For our app, set the Layout to Vertical. Set the Height Size to Size to Fit Content. Drag two labels into the group. Title them like this:

Go to the storyboard and drag out an interface. Drag two labels to the interface. On the upper label, change the color to Yellow(#FFFF00), and a title of Average Pace. Make both labels have a width Relative to Container. Make the white one Align Center, with a title of 00:00:00. Click the view controller icon and set the title and identifier to Info. When done, you should have an interface that looks like this one.

Adding and Connecting View Controller Classes
We have three view controllers we’ll need to hook up. We have the new Info interface, the row controller and the main InterfaceController
Connecting the Info controller
Add a new file by pressing Command-N. Make a WatchKit Class that subclasses WKInterfaceController called InfoInterfaceController. Be sure it is saved in the extension group and not the app group by clicking the drop down menu on the save menu.

Go to the storyboard. Click the view controller icon on the Info interface. In the Identity inspector, set the Class to InfoInterfaceController. Open the assistant editor. Control drag from the Info Interface to the code to make this outlet:
@IBOutlet var paceLabel: WKInterfaceLabel!
Connecting the Table Row Controller
Tap Command-N to make a new file. Create a new WatchKit Class named TableRowController. Subclass NSObject for this file. Save the file in the WatchKit Extension Group. Row controllers don’t do a lot. Typically they contain the outlets for the controls in the row controller. In the code that appears, add two outlets for WKInterfaceLabel, splits and time.
class TableRowController: NSObject {
    @IBOutlet weak var splits: WKInterfaceLabel!
    @IBOutlet weak var time: WKInterfaceLabel!
}
Go to the storyboard. Click on the row controller named row in the document outline. In the identity inspector, change the Class to TableRowController. Open the assistant editor. Xcode assumes you want to work with the interface. Most likely you will see the InterfaceController.swift file in the assistant editor. Click at the top where it says Automatic and select Manual. Select through the choices to get the Watchkit Extension file TableRowController.swift. From the circles to the left of the outlets, connect the outlets to the controls on the storyboard by dragging from the circle next to the code to the control. We’ve now connected the row controller to the storyboard.
Setting the View Controller
Change the assistant editor back to automatic and InterfaceController.swift should be back in the assistant editor. Add the following outlets and actions to the code:
@IBOutlet var totalTimeLabel: WKInterfaceLabel!
@IBOutlet var avgPaceLabel: WKInterfaceLabel!
@IBOutlet var table: WKInterfaceTable!
@IBAction func toBottomAction() {
    table.scrollToRowAtIndex(table.numberOfRows - 1)
}
@IBAction func toTopAction() {
    table.scrollToRowAtIndex(0)
}
Connect the controls to the outlets and actions. You’ll notice we included some code in the buttons. This will scroll to the top and bottom of the table using the scrollToRowAtIndex method. As we discussed in the previous lesson, we can place controls before and after the table as headers and footers. Close the assistant editor.
Adding a Model Class
We’ll use an array named data to hold our values. Add a file by pressing Command-N. Make a new Watchkit Class subclassing NSObject named RunData . When you save the class, be sure that you are saving in the extension group. When the code appears, add the following code:
class RunData: NSObject {
    var data = [654,862,860,802,774,716,892,775,748,886,835]
    var count:Int {
        get{
            return data.count
        }
    }
    //A function to change the seconds data from an integer to a string in the form 00:00:00
    class func paceSeconds(pace:Int) -> String{
        let hours = pace / 3600
        let remainingSeconds = pace % 3600
        let minutes = remainingSeconds / 60
        let seconds = pace % 60
        return String(format:"%02i:%02i:%02i",hours,minutes,seconds)

    }
        func totalTimeFromSplit(split:Int, toSplit:Int) -> Int{
        var total = 0
        for index in split...toSplit{
            total+=data[index]
        }
        return total
    }

    func avgPaceFromSplit(split:Int, toSplit:Int) -> Int{
        let count = ((toSplit) - split) + 1
        return totalTimeFromSplit(split, toSplit: toSplit) / count
    }
We done several things to this model. We added the array data. For ease in use, we added the property count. We added a conversion method from seconds to a string. We’ll find that this method paceSeconds is very useful as a class method, so we made it one. We also added two methods to calculate average paces and total times for a range of splits.
Make the Table
Go to the InterfaceController.swift code. Add your model just under the outlets.
let runData = RunData()
Add the following method to the class
func tableRefresh(){
    table.setNumberOfRows(runData.count, withRowType: "row")
    for index in 0 ..< table.numberOfRows {
        let row = table.rowControllerAtIndex(index) as! TableRowController
        let rowString = String(format: "Split:%02i miles", index + 1)
        let paceString = "Pace:" + RunData.stringFromSeconds(runData.data[index])
        row.splits.setText(rowString)
        row.time.setText(paceString)
    }
    let totalPace = runData.totalTimeFromSplit(0, toSplit: runData.count - 1)
    let avgPace = runData.avgPaceFromSplit(0, toSplit: runData.count - 1)
    totalTimeLabel.setText(RunData.stringFromSeconds(totalPace))
    avgPaceLabel.setText(RunData.stringFromSeconds(avgPace))
}
As discussed last lesson. WatchOS does away with all the delegates based table stuff. In its place is an array of table row controllers. We set the number of rows and the type of row in the table with setNumberOfRows. We loop through the array, assigning the current row to row and populate it with data. After the loop, we set the totals labels for the run. Add the method tableRefresh to viewWillAppear
override func willActivate() {
        super.willActivate()
        tableRefresh()
    }
Select a simulator of a 42mm watch. Build and run.

Selecting Rows in a Table
Selecting row in a table is easy. You override the method table(table: didSelectRowAtIndex rowIndex:) method.
We’ll take our average pace and display it on a separate page when we select a row in the table. Add this selection method:
//table selection method
   override func table(table: WKInterfaceTable, didSelectRowAtIndex rowIndex: Int) {
        //build a context for the data

        let avgPace = runData.avgPaceFromSplit(0, toSplit:rowIndex)
        presentControllerWithName("Info", context: avgPace) //present the view controller
    }
Using the value of rowIndex, We made a string for our context. I first get the value I need from the appropriate function, then convert it to a string with paceSeconds. I assign the string to the context as an AnyObject. Finally I present the view controller with the name Info with the context.
Go to the InfoInterfaceController.Swift File. Change the class to this
class InfoInterfaceController: WKInterfaceController {

    @IBOutlet weak var paceLabel: WKInterfaceLabel!

    override func awakeWithContext(context: AnyObject?) {
        super.awakeWithContext(context)
        let pace = context as! Int
        paceLabel.setText(RunData.StringFromSeconds(pace))
    }
}
When the view awakes, we take the context, convert it back to a string and then place it in the label. Go back to the storyboard. Click the view controller icon on the info controller we just made. In the identity inspector make the controller InfoInterfaceController. Open the assistant editor, and drag from the circle in the view controller code to the white label until it highlights. Release the mouse button.
Build and run.
Click on the split for 5 miles,

and you get an average pace for the split.

Click Info to return to the table.
Adding a Context Menu
In the rest of the lesson, we’ll add a few new functions to control the table. This is a good place to use a context menu. Context menus will appear when you force touch on the watch. In the Object Library, find the context menu.

On the storyboard, drag a menu from the object library to the table controller, and drop on top of the controller

It disappears. You can only see it in the document outline. If the document outline is not open, open it by clicking the icon in the lower left corner of the storyboard.

In the document outline, select the menu. In the attribute inspector, change the items to 3.

Click on the arrow next to the menu. The document outline changes to have three menu Items.

Menus can have both custom and built-in items. We’ll use built-in icons for this application. Click the top menu item in the document, In the attributes inspector, change the title to Add Row and change the image to Add.

For the second menu item, change the title to Delete Row and the image to Trash. For the last item change the Title to Reset and the image to Repeat.
Open the assistant editor if not open. Set the editor to Automatic. From the document outline, control-drag from the menu items to the InterfaceController code. Make three actions addRow, deleteRow, and resetRows.
Close the assistant editor for now.
Build and run. On a watch, hold down on your watch. In the simulator, you’ll need to change the pressure. From the drop down menu for the simulator, select Hardware>Force Touch Pressure>Deep Press or use the keyboard combination Shift-Command-2

Now give a click on the watch face. The menu should appear:

Set the simulator back to Shallow Press (Shift-Command-1) to select a button.
Adding Reset
We will be adding and deleting data in this demo. It will be helpful to add a reset method. Go to the RunData class. Add a class method like this.
//return the original array of Data
    class func resetData() -> [Int]{
        return [654,862,860,802,774,716,892,775,748,886,835]
    }
Since this is the same data in the array as the initialization, you can cut and paste that if you wish.
In InterfaceController, go to the menu action for the reset menu item. Change the code there to this:
    @IBAction func resetRows() {
        runData.data = RunData.resetData()
        tableRefresh()
        selectedRow = nil
    }
The code reloads the array into the data property. We then refresh the table.
Selecting the Row
We have an error on the last line of this method. As a property, add the following to the InterfaceController class:
var selectedRow:Int! = nil
We’ll need to keep track of the row we last selected. That will be the row we’ll use to add or delete rows. However we may have an unselected state. To keep track of this we use an optional value. If the property is nil, there is no selection. In resetRows we reset everything, so we lose our selection, and set selectedRow to nil
in our table:DidiSelectRowAtIndex method, add the following line as the first line of code in the method:
selectedRow = rowIndex //for use with insert and delete
Adding An Alert
Whenever we select a row, we set our selectRow property.
since we can have a nil value, we need to handle trying to delete nothing. We’ll need an alert to tell the user this won’t work. Go to the storyboard. Add another interface. In the attributes inspector, make the identifier No Splits Alert and the title Back.

Add two labels. Use an exclamation emoji at 56 point in the bottom one and The text No Splits were Selected. Set the width to Relative to Container and align it Centered. Add text to the label so the interface looks like this:

I went lazy here and used the built-in back button to handle dismissing the alert. If you want you can make another WKInterfaceController class and add a button to dismiss the alert. We’ll come back to this shortly.
Deleting Rows From a Table
To delete a row, we delete the element in the array, then refresh the table. However, we also have to check for a nil value and handle those. Add this code to the deleteRow action in the Interface controller
    @IBAction func deleteRow() {
        if let row:Int = selectedRow{
            runData.removeItemAtIndex(row)
            tableRefresh()
            selectedRow = nil
        } else {
          presentControllerWithName("No Splits Alert", context: nil)
        }
    }
We use optional chaining to make row from selected row. If nil, we present the alert. Otherwise we run a method in the model to remove the item, refresh the table, and set selectedRow to nil. In RunData, we need to add that removeItemAtIndex method:
    func removeItemAtIndex(index:Int){
        data.removeAtIndex(index)
    }
Build and run. Go to the table, and then the menu. Hit Delete Row and we get our alert:

Go back to the table and select the 9 mile.

Go back to the table, and then delete from the menu. The 9 mile is still there but the pace changes to what the 10 mile pace was.

Since we figured distance by the element number, our numbers mess up in this example. This is to keep things as simple as possible. If you wanted you could make a more robust model that had both miles and pace to prevent this problem.
Adding a Row to the Table
For adding we’ll do one of two things: if we select a row, we add that row at that index location. If we don’t select a row, we’ll add at the end of the splits, making a new finish time. But before we do we need to get what the pace is.
Adding Items in the Model
We are trying to keep to MVC and all direct manipulations of the array happen in the model class. We add items to the array, so our model will need an add function. Add the following code to the RunData class:
func addItemAtIndex(index:Int,item:Int){
        data.insert(item, atIndex: index)
    }
Make a Input Controller
We are going to do a big cheat just to keep this short. We’ll use a text input and select a pace from the selections on the text input. In a real app this is not how to do this, but it demonstrates a text input and saves us from doing a lot of extra work building another view controller with delegates. The right way to do this is build another table with times in it, or to build a controller with three sliders, then use a delegate to get back your input to the InterfaceController class.
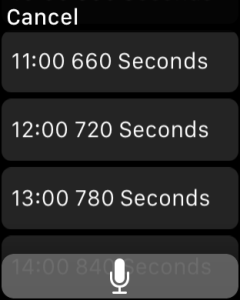
Text input controllers are a system generated controller that takes a string array of possible responses. You can set your controller to also select emoji and animated emoji. The user always has the option for using dictation, by pressing the microphone button that appears and returning the dictation as text. It’s the microphone that’s the problem with this code. A good developer needs to handle the code for a dictation response. In our code we will only handle the selection response.
Go to InterfaceController.swift. In the addRow method add the two following declarations
 //selections for the text input
        let timeSelections = [
            "08:00 480 Seconds",
            "09:00 540 Seconds",
            "10:00 600 Seconds",
            "11:00 660 Seconds",
            "12:00 720 Seconds",
            "13:00 780 Seconds",
            "14:00 840 Seconds",
            "15:00 900 Seconds"]
        var seconds = 0
The timeSelections array contains information we’ll use to select our time. We’ll use these as selections to display by getting sneaky later. We’ll use the variable seconds to store our final selection. Add the text input controller under these declarations:
// Present a text controller with suggested times
presentTextInputControllerWithSuggestions(
    timeSelections,
    allowedInputMode: .Plain,
    completion: {(results) -> Void in
// Add the completion code here in the closure
})
The method presentTextInputControllerWithSuggestions does all of our UI for us. We add our string array timeSelections and we have our selections displayed in a table view. The parameter allowedInputMode has three choices. The .Plain we selected will only allow text and no emoji. The selections .AllowEmoji and .AllowAnimatedEmoji will do exactly as they say – Allow you to have standard emoji or return an animated graphic. We’ll stick to plain text. The last parameter is the closure completion: Add the completion handler in the closure
if results != nil && results!.count > 0 {
//selection made
    let aResult = results?[0] as! String
    let times = aResult.componentsSeparatedByCharactersInSet(NSCharacterSet.whitespaceCharacterSet())
// we will make an assumption here and no one
// will use dictation. NOT a good idea
// but simplifies the code.
    seconds = Int(times[1])!
}
When the input controller completes, it returns [AnyObject]? into results. This array will have only one element: our text string. We extract that string into aResult. Then we get tricky. We turn that string into a string array, using the method componentsSeperatedByCharactersInSet. I intentionally put a space between the time, seconds and word Seconds. Using the NSCharacterSet which is all the white space characters, I break the text into a three element array. I know that the third element is the time in seconds, so I convert that to an integer.
We have the input. Add the time to the table:
if selectedRow != nil{
    runData.addItemAtIndex(selectedRow, item: seconds)
} else {
     runData.addItemAtIndex(runData.count - 1, item: seconds)
}
tableRefresh()
Make sure all of that code is inside the closure. The text input runs parallel to the table and wont update our table unless it is all in the closure. We’ve set up everything. Build and run. Go to the menu and select Add Row. Scroll down and Select the time 12:00 720 seconds
Tap the bottom button or scroll to the bottom. You will have a mile 12 with the finish data of 12:00. The data appended to the table since we had no selected split.

Select Mile 9, which has a 12:28 pace. We’ll find a 13:07 Average Pace,

Then exit from the average pace view and add a 8:00 pace.

Mile 9 is now 8:00 and mile 10 is 12:28. We inserted the new pace data into the selected slot.

Some of you have been itching to hit that microphone. If you have a watch to run the app on, go ahead and add another split. Tap the microphone and you get a voice input.

Say ” Time eight three five seconds”

Press Done. Time for mile 9 is now 13:55

Try it again, this time saying “Time four thirty-five seconds”

We crash since Int() returns nil. The words to/two and for/four confuse dictation.
You can add some protection like this. Change the integer conversion to this:
// we will make an assumption here and no one
// will use dictation. NOT a good idea
// but simplifies the code.
// if we don't get an integer for the second element do nothing.
if let seconds = Int(times[1]){
    if self.selectedRow != nil{
        self.runData.addItemAtIndex(
             self.selectedRow,
               item: seconds)
    } else {
        self.runData.addItemAtIndex(
            self.runData.count - 1,
             item: seconds)
    }
Comment out the line
//var seconds = 0
This will only add a row if we have valid data. there’s still several ways that data can be invalid, such as an array less than two elements, but this solves a lot of them.
Subtotals and Multiple-Row Tables
We’ve looked at the setNumberowRows:withRowType method to make a table with a single row type. For example we had this:
table.setNumberOfRows(runData.data.count, withRowType: "row")
We used the count property of an array with our data to present and give one row type. For a multiple row types we use a different method:
table.setRowTypes(rowTypes)
where rowtypes is an array of strings identifying row types. Row types are the row identifiers in the storyboard for row controllers in a table. I could, for example, have a table set like this in my storyboard:

I would take each of the groups in this table and identify them as a part of the table: Header, Sub Total, Row, and Total.
If I had 4 data points like this:
var data = [740,745,750,740]
I could make a row header like this to show the correct type of row by the an element in row type.
var rowTypes = ["Header","Sub Total", "Row","Row","Sub Total", "Row","Row","Total"]
Swift would know how many rows we have here since it is rowTypes.count. If you are sharp and have followed along, you’ll notice the problem there is with this code. In our previous lessons, we would get a row with a loop like this:
for var index = 0; index < table.numberOfRows; index++ {
    let row = table.rowControllerAtIndex(index) as! TableRowController //get the row
    let dataString = String(format:"%02",data[index])
    //Set the properties of the row Controller.
    row.label.setText(dataString)
} //end loop
We get a row, and downcast it to the correct row controller class. We take the data in the array, index to place the data in the row controller’s label. This works fine with a single row type table. Add more than one row type and things get a bit dicey. We don’t know what class or row controller to use, and we don’t know where the data is since there is not a one to one correspondence with the index. In the rowTypes array above, the value of data[0] is in rowtype[2]
Some people will only use a header and a footer.
var rowTypes = ["Header","Row","Row","Row","Row","Footer"]
For those cases you could put some code before and after the loop to handle the header and footer. A better option is not use a header or footer, and make the header and footer information outside the table like was have our totals in our demo. Subheads and sub footers are not so easy though. How do you know when they exist, and what do you do when they show up in the array? They’ll also mess up correspondence to the data array even more than before.
For all these cases it’s easier to have a switch..case in our loop to parse the type. Read the rowtype array, and then react accordingly.
So far I’ve kept these two broken into two arrays. We could use one array with a class, struct or dictionary. We’ll use the dictionary [String:AnyObject] and have two keys: time and type. We’ll generate an array before we display it with the correct types.
Many runners like to break their runs into 5 kilometer chunks. While not exactly 5 Kilometers(3.11 miles), we can get a close estimate by using 3 miles. Every three miles we’ll add another row with the average pace for the three rows before it.
Change the Storyboard
Go to the storyboard in the App Extension. Select the table. In the attributes inspector, change the number of Prototype Rows from 1 to 2,

In the document outline, you will see the two row controllers:

We have one Row and one Table Row Controller. Click on the Table Row Controller in the document outline. In the attribute inspector, change the Identifier for the row controller to Split5K. Also deselect the Selectable check box.

It will change in the document outline to Split5K. Select the group in the table controller. Change the height to Size to Fit Content. Change the background color to Green(#00CC00).
Drag to the Split5K group on the storyboard a label. Change the width to Relative to Container. Change the text on the top label to 5K – . Change the font to Subhead, and the text color to Black(#000000). When done, your table should look like this.

Add TableRowControllers
We need a class for the new row controllers. On the drop-down menu, go to File>New>File or Tap Command-N on the keyboard. Make a new WatchOS class Split5kTableRowController subclassing NSObject. Save the file in the WatchKit extension group.
Go back to the storyboard. In the document outline select the Split5K table row controller. In the identity inspector, change the class to Split5KTableRowController. Open the assistant editor. In the assistant editor you will have to manually specify the Split5KTableRowController.
If not visible, open the outline for the Split5K row so you can see the label. This is one of those times it is much easier to select from the outline than the objects on the storyboard. Control drag the label to the row controller class. Make a label outlet named splits.
Close up the assistant editor.
Coding the Multiple Row View Controller
With a multiple row controllers, the data in the array the table does not have a 1:1 index relationship since the 5k splits get in the way of the index count for the data. We solve that by making several arrays which will have a common index. Add this to our code’s property declarations
var tableTime = [Int]()
var tableRowType = [String]()
var tableSplit = [Int]()
These three arrays hold the data for the table, in the table’s order. tableTime is the time in seconds. We keep track of the type in the array tableRowType. Our last array tableSplit does double duty. For a row, it has the index of the data array. For a 5K split, it has the distance in kilometers.
The refreshTableData() method
Before we display a table, we’ll construct these three arrays with new data. Add the following method and code to your InterfaceController class:
func refreshTableData(){
    var rowType = "row"
    var rowTime = 0
    var rowSplit = 0
    let subtotalEntry = 3
    var index = 0
    var counter = 0
    var counter5K = 1

// clear  the arrays
        tableTime = []
        tableRowType = []
        tableSplit = []
The variable rowType, rowTime,and rowSplit hold the values we’ll add to the array for each row in the table. Or constant subtotalEntry indicates that every three rows we’ll add a 5K Split row. We’ll use several counters index, counter, and counter5k to keep track of all the counts and indices. We are going to use a while loop to construct our table, and thus the need for counters. Add this to the code:
//populate the arrays
while index < runData.count{
//every three rows, add a 5k pace row
    if counter == subtotalEntry{
        counter = 0 //reset counting 3 rows
        counter5K += 1
//Add a regular row
            } else {
                index += 1
                counter += 1
            }
The variable counter counts to 3. When it reaches 3, we include a 5K split row, then reset counter. In that row we’ll use the current index to figure out the intervals to average. To keep track of the distance measure for the 5k splits, we have another counter counter5K. For data rows, we grab the current index and access the correct element in runData.data, then increment our counters. Flesh this out by assigning rowType, rowTime,and rowSplit proper values:
//populate the arrays
while index < runData.count{
//every three rows, add a 5k pace row
    if counter == subtotalEntry{
        counter = 0 //reset counting 3 rows
        rowType = "Split5K"
        rowTime = runData.avgPaceFromSplit(
            (index - (subtotalEntry - 1)),
            toSplit: index)
        rowSplit = counter5K * 5
        counter5K += 1
//Add a regular row
    } else {
        rowType = "row"
        rowTime = runData.data[index]
        rowSplit = index
        index += 1
        counter += 1
    }
The variable rowType sets to one of our two controllers: row or Split5k. We get our data and the index in rowTime and rowSplit respectively. Now add this inside the loop, under the if..else clause:
 //Add the data to the array
            tableTime += [rowTime]
            tableRowType += [rowType]
            tableSplit += [rowSplit]
This appends the data to the three arrays. We end up with three arrays usable by our table.
Modifying the tableRefresh Method
With good data we can modify the tableRefresh method in InterfaceController. In the code so far we had the table.setNumberOfRows method. Comment that out and replace it like this:
//refresh the data
refreshTableData()
//set the rows in the table
//table.setNumberOfRows(
//    runData.count,
//     withRowType: "row")
table.setRowTypes(tableRowType)
Instead of setting the number of rows, we give the table a string array with the table types. When using setRowTypes, I strongly suggest naming everything the same. Your storyboard identifier should be the same as your view controller name and the type name you use here. I used Split5k for all three. The compiler looks for a controller Split5KTableRowController when you have a type of Split5K. If you are getting nil errors when accessing a table row, this may be the culprit.
We have to deal with both view controllers now. In many cases, it may be more, so I tend to use a switch statement to parse between the different controllers. Change the for loop to this
for index in 0 ..< table.numberOfRows {
    switch tableRowType[index]{
    case "Split5K":
        let row =
            table.rowControllerAtIndex(index)
            as! Split5KTableRowController
        let paceString =
           String(
               format: "%iK - ",
               tableSplit[index]) +
           RunData.stringFromSeconds(
               tableTime[index])
           + " Pace"
          row.splits.setText(paceString)
    default:
        let row =
            table.rowControllerAtIndex(index)
                 as! TableRowController
        let rowString = String(
            format: "Split:%02i miles",
            tableSplit[index] + 1)
        let paceString = "Pace:" +
              RunData.stringFromSeconds(
                   tableTime[index])
         row.splits.setText(rowString)
         row.time.setText(paceString)
      }
}
In our earlier iteration, numberOfRows was set explicitly. In this version, it is implicit as the size for the tableRowType array sets our size. In the loop we get tableRowType[index] to parse the row type. For 5K Splits we have one code. In this example, I set us up to turn everything into a row that wasn’t anything else. You could make a row case and an default case for an error, but I was trying to be compact here.
Notice we changed the code in the original version for the rows to use the arrays, not index and runData.data
let rowString = String(
    format: "Split:%02i miles",
    tableSplit[index] + 1)
let paceString = "Pace:" +
    RunData.stringFromSeconds(tableTime[index])
Similarly, we used the arrays in the 5K split code
let row = table.rowControllerAtIndex(index)
    as! Split5KTableRowController
let paceString = String(format: "%iK - ",
             tableSplit[index]) +
     RunData.stringFromSeconds(tableTime[index])
     + " Pace"
Build and run. The splits show up.

But if you try to select a row, the app crashes.
Selection with Multiple Rows
Why did it fail? Look at the didSelectRowAtIndex code.
override func table(
    table: WKInterfaceTable,
    didSelectRowAtIndex rowIndex: Int)
{
     selectedRow = rowIndex
let avgPace = runData.avgPaceFromSplit(0,
     toSplit:rowIndex)
presentControllerWithName("Info",
     context: avgPace) //present the viewcontroller
}
 We access data from the
 rowIndex. In a single row table, this is no problem. However with a multi-Row table the index does not describe the data. Look at the illustration above. With our code, rowIndex 6 would try to get data from dataIndex 6, which causes an overflow error.
On the other hand, if we have a list somewhere that says row 2 is really row 0 , we are  all set. That’s why
 TableSplit isn’t cosmetic, but critical. For rows, it holds the index back to runData.data. We need to make only a few changes to get the selection code to work.
Change
selectionIndex = rowIndex
to this:
selectionIndex = tableSplit[rowIndex]
With this small change, all our add and delete functions will work right too, since they depend on selectionIndex to work with the correct rows.
We also will need a change for the context. Change this
let avgPace = runData.avgPaceFromSplit(0,
     toSplit:rowIndex)
to this:
let avgPace = runData.avgPaceFromSplit(0,
     toSplit:rowIndex)
Build and run. You can now select a row.

With this code you can get rather sophisticated with table views in a watch. The question remains if you would want to. A watch is to be looked at for a seconds, not minutes, hence long tables are probably a bad idea. However, if your application calls for them, they are an option.
The Whole Code
Interfacecontroller.swift
//
//  InterfaceController.swift
//  SwiftWatchOSTableDemo WatchKit Extension
//
//  Created by Steven Lipton on 3/24/16.
//  Copyright © 2016 MakeAppPie.Com. All rights reserved.
//

import WatchKit
import Foundation


class InterfaceController: WKInterfaceController {

    @IBOutlet var totalTimeLabel: WKInterfaceLabel!
    @IBOutlet var avgPaceLabel: WKInterfaceLabel!
    @IBOutlet var table: WKInterfaceTable!
    let runData = RunData()
    var selectedRow:Int! = nil
    var tableTime = [Int]()
    var tableRowType = [String]()
    var tableSplit = [Int]()

    @IBAction func addRow() {
        //selections for the text input
        let timeSelections = [
            "08:00 480 Seconds",
            "09:00 540 Seconds",
            "10:00 600 Seconds",
            "11:00 660 Seconds",
            "12:00 720 Seconds",
            "13:00 780 Seconds",
            "14:00 840 Seconds",
            "15:00 900 Seconds"]
        // Present a text controller with suggested times
        presentTextInputControllerWithSuggestions(timeSelections,
            allowedInputMode: .Plain,
            completion: {(results) -> Void in
                if results != nil && results!.count > 0 {
                    //Selection made
                    let aResult = results?[0] as! String
                    let times = aResult.componentsSeparatedByCharactersInSet(NSCharacterSet.whitespaceCharacterSet())
                    // We will make an assumption here and no one
                    // Will use dictation. NOT a good idea
                    // but simplifies the code.
                    // If we dont get an integer for the second element do nothing.
                    if let seconds = Int(times[1]){
                        if self.selectedRow != nil{
                            self.runData.addItemAtIndex(self.selectedRow, item: seconds)
                        } else {
                            self.runData.addItemAtIndex(self.runData.count, item: seconds)
                        }
                        self.tableRefresh()
                    }
                }
        })
    }

    @IBAction func deleteRow() {
        if let row:Int = selectedRow{
            runData.removeItemAtIndex(row)
            tableRefresh()
            selectedRow = nil
        } else {
            presentControllerWithName("No Splits Alert", context: nil)
        }
    }

    @IBAction func resetRows() {
        runData.data = RunData.resetData()
        tableRefresh()
        selectedRow = nil
    }
    @IBAction func toBottomAction() {
        table.scrollToRowAtIndex(table.numberOfRows - 1)
    }
    @IBAction func toTopAction() {
        table.scrollToRowAtIndex(0)
    }

    func refreshTableData(){
        var rowType = "row"
        var rowTime = 0
        var rowSplit = 0

        let subtotalEntry = 3
        var index = 0
        var counter = 0
        var counter5K = 1
        // clear  the arrays
        tableTime = []
        tableRowType = []
        tableSplit = []

//Populate the arrays
       while index < runData.count{
//Every three rows, add a 5k pace row
            if counter == subtotalEntry{
                counter = 0 //reset counting 3 rows
                rowType = "Split5K"
                rowTime = runData.avgPaceFromSplit( (index - (subtotalEntry - 1)), toSplit: index)
                rowSplit = counter5K * 5
                counter5K += 1
//Add a regular row
            } else {
                rowType = "row"
                rowTime = runData.data[index]
                rowSplit = index
                index += 1
                counter += 1
            }
//Add the data to the array
            tableTime += [rowTime]
            tableRowType += [rowType]
            tableSplit += [rowSplit]
        }

}

    func tableRefresh(){
        //Refresh the data
        refreshTableData()
        //Set the rows inthe table
        //table.setNumberOfRows(runData.count, withRowType: "row")
        table.setRowTypes(tableRowType)
        for index in 0 ..< table.numberOfRows {
            switch tableRowType[index]{
            case "Split5K":
                let row = table.rowControllerAtIndex(index) as! Split5KTableRowController
                let paceString = String(format: "%iK - ", tableSplit[index]) + RunData.stringFromSeconds(tableTime[index]) + " Pace"
                row.splits.setText(paceString)
            default:
                let row = table.rowControllerAtIndex(index) as! TableRowController
                let rowString = String(format: "Split:%02i miles", tableSplit[index] + 1)
                let paceString = "Pace:" + RunData.stringFromSeconds(tableTime[index])
                row.splits.setText(rowString)
                row.time.setText(paceString)
            }
        }
        let totalPace = runData.totalTimeFromSplit(0, toSplit: runData.count - 1)
        let avgPace = runData.avgPaceFromSplit(0, toSplit: runData.count - 1)
        totalTimeLabel.setText(RunData.stringFromSeconds(totalPace))
        avgPaceLabel.setText(RunData.stringFromSeconds(avgPace))
    }
    //Table selection method
    override func table(table: WKInterfaceTable, didSelectRowAtIndex rowIndex: Int) {
        //for use with insert and delete
        selectedRow = tableSplit[rowIndex]

        //Build a context for the data
        let avgPace = runData.avgPaceFromSplit(0, toSplit:selectedRow)
        presentControllerWithName("Info", context: avgPace) //present the viewcontroller
           }
    override func awakeWithContext(context: AnyObject?) {
        super.awakeWithContext(context)

        // Configure interface objects here.
    }

    override func willActivate() {
        super.willActivate()
        tableRefresh()
    }

    override func didDeactivate() {
        // This method is called when watch view controller is no longer visible
        super.didDeactivate()
    }

}
RunData.swift
//
//  RunData.swift
//  SwiftWatchOSTableDemo
//
//  Created by Steven Lipton on 3/24/16.
//  Copyright © 2016 MakeAppPie.Com. All rights reserved.
//

import WatchKit

class RunData: NSObject {
    var data = [654,862,860,802,774,716,892,775,748,886,835]
    var count:Int {
        get{
            return data.count
        }
    }
    //A function to change the seconds data from an integer to a string in the form 00:00:00
    class func stringFromSeconds(pace:Int) -> String{
        let hours = pace / 3600
        let remainingSeconds = pace % 3600
        let minutes = remainingSeconds / 60
        let seconds = pace % 60
        return String(format:"%02i:%02i:%02i",hours,minutes,seconds)
    }
    //Reset the original array
    class func resetData() -> [Int]{
        return [654,862,860,802,774,716,892,775,748,886,835]
    }
    //Remove a data item
    func removeItemAtIndex(index:Int){
        data.removeAtIndex(index)
    }
    //Add a data item
    func addItemAtIndex(index:Int,item:Int){
        print ("inserting \(item) at index \(index)")
        data.insert(item, atIndex: index)
    }

    func totalTimeFromSplit(split:Int, toSplit:Int) -> Int{
        var total = 0
        for index in split...toSplit{
            total+=data[index]
        }
        return total
    }

    func avgPaceFromSplit(split:Int, toSplit:Int) -> Int{
        let count = ((toSplit) - split) + 1
        return totalTimeFromSplit(split, toSplit: toSplit) / count
    }
}
InfoInterfaceController.swift
//
//  InfoInterfaceController.swift
//  SwiftWatchOSTableDemo
//
//  Created by Steven Lipton on 3/24/16.
//  Copyright © 2016 MakeAppPie.Com. All rights reserved.
//

import WatchKit
import Foundation


class InfoInterfaceController: WKInterfaceController {
 @IBOutlet var paceLabel: WKInterfaceLabel!

    override func awakeWithContext(context: AnyObject?) {

        super.awakeWithContext(context)
        let pace = context as! Int
        paceLabel.setText(RunData.stringFromSeconds(pace))
    }

}
TableRowController.swift
//
//  TableRowController.swift
//  SwiftWatchOSTableDemo
//
//  Created by Steven Lipton on 3/24/16.
//  Copyright © 2016 MakeAppPie.Com. All rights reserved.
//

import WatchKit

class TableRowController: NSObject {
    @IBOutlet weak var splits: WKInterfaceLabel!
    @IBOutlet weak var time: WKInterfaceLabel!
}
Split5KTableRowController.swift
//
//  Split5KTableRowController.swift
//  SwiftWatchOSTableDemo
//
//  Created by Steven Lipton on 3/31/16.
//  Copyright © 2016 MakeAppPie.Com. All rights reserved.
//

import WatchKit

class Split5KTableRowController: NSObject {
    @IBOutlet weak var splits:WKInterfaceLabel!
}

Leave a comment