Make App Pie

Training for Developers and Artists

The Swift Swift Tutorial: How To Use UIViews With Auto Layout Programmatically

Screenshot 2014-07-25 06.37.09
[Updated for Swift 2.0 9/16/15 SJL]
Auto Layout in interface builder, can be a frustrating experience for those who do not know how to use it. Once you understand how to use Auto Layout, it becomes part of a simple workflow. However, there are times you code a button or label instead of using Interface Builder. For those cases you need to code your constraints too. Constraints in code, is an incredibly powerful way of laying out UIViews into a  useful interface. This lesson will introduce the steps in Swift to programmatically add UIView and its subclasses to an already existent view, then how to place them using Auto Layout.

Make and Set Up the Project

Create a new project for iPhone  named SwiftAutoLayout with a single view.  Since we want to explore how rotation affects Auto Layout, check all the device orientations. Click into the ViewController.Swift file, and under viewDidLoad() add this code:

  // How to set the orientation.
   override func supportedInterfaceOrientations() -> UIInterfaceOrientationMask {
        return UIInterfaceOrientationMask.All
   }

This is the override to use all orientations. There’s a lot going on here in line 3. Unlike Objective-C there are no factory constants, only structs. If you look for the constant UIInterfaceOrientationMaskAll in the auto suggest, you will not find it. You will find UIInterfaceOrientationMask instead and then need to use dot notation to get the All or other possibilities. We’ll see more examples of this later.

Next in our code is to set up viewDidLoad(). Change it to the following:

override func viewDidLoad() {
    super.viewDidLoad()
    // Do any additional setup after loading the view, typically from a nib.
    view.backgroundColor = UIColor(
        red: 0.9,
        green: 0.9,
        blue: 1,
        alpha: 1.0)
    makeLayout()
}

We set a background color and call the method where we will do most of our work. Since we set up that method, you can add it near the top of the ViewController class.

func makeLayout(){
}

Add Two UIViews

We will use two colored rectangles to start our layout. In makeLayout() add the following:

//     Make a view
let view1 = UIView()
view1.translatesAutoresizingMaskIntoConstraints = false
view1.backgroundColor = UIColor.redColor()
        
//Make a second view
let view2 = UIView()
view2.translatesAutoresizingMaskIntoConstraints = false
view2.backgroundColor = UIColor(
    red: 0.75,
    green: 0.75,
    blue: 0.1, 
    alpha: 1.0)

The code for these two is similar. In line 2 and 7, we instantiate a view. Line 3 and 8 is critical if you are using Auto Layout. It shuts down the auto resizing mask, which is an automatic way for Xcode to calculate constraints. Xcode has a very bad habit of making far too many constraints, and will cause a run-time error claiming you have too many constraints if you set any constraint programmatically. Set this to false and give yourself total control of the constraints. In the last line of both views, we set a color for the view.

Under this code, add the following:

//Add the views
view.addSubview(view1)
view.addSubview(view2)

I tend to keep my adding of sub views together as much as possible, so I can control and document the stacking order. With that, we have two views.

Size the Views with Auto Layout

If you build and run, you will see a colored background and nothing else. Our views have no size yet. With Auto Layout it is easiest to set the size constraints of the views on the view itself. Add the following code below our adding of the sub views:

//--------------- constraints

//make dictionary for views
let viewsDictionary = [
    "view1":view1,
    "view2":view2]

In order to use constraints, we need a dictionary of our views. Line 4 creates this dictionary, which looks pretty obvious to the eye. The key has a value of the view. Now that we have this, we can add the following under it:

//sizing constraints
//view1
let view1_constraint_H = NSLayoutConstraint.constraintsWithVisualFormat(
    "H:[view1(50)]",
    options: NSLayoutFormatOptions(rawValue: 0),
    metrics: nil, views: viewsDictionary)
let view1_constraint_V = NSLayoutConstraint.constraintsWithVisualFormat(
    "V:[view1(50)]", 
    options: NSLayoutFormatOptions(rawValue:0), 
    metrics: nil, views: viewsDictionary)
        
view1.addConstraints(view1_constraint_H)
view1.addConstraints(view1_constraint_V)

Line 3 and 4 use the constraintsWithVisualFormat class method to make horizontal and vertical sizing constraints — the height and width. The two lines are very similar in code except for the first parameter, which is the visual format string. Visual Format Language is a way to describe how to set up the constraints using keyboard characters. A keyword surrounded by square brackets [] is a view. After the name, in parentheses () is the size of the view. The first two characters are either H: or V: standing for horizontal or vertical . Horizontal is the default and can be left off, but for code readability, I tend to add it. In our example "H:[view1(50)]" means we want a 50 point wide view and "V:[view1(50)]" means we want a 50 point high view. We have to send the options: a value from the struct NSLayoutFormatOptions. However None is missing or left out of the possible choices. The NSLayoutFormatOptions does have an initializer which takes a value using rawValue. By setting the initializer to rawValue:0, we tell teh compiler we are doing nothing here. The parameter metrics: we will discuss shortly, but for now leave it nil. Our last parameter is our view dictionary, which allows the method to know which views we are referring to in [].

Build and run this code. You’ll get a single red square in the upper left of the screen.

Screenshot 2014-07-25 05.29.42

Let’s make constraints to size the second view. Add the following code:

//view2
let view2_constraint_H = NSLayoutConstraint.constraintsWithVisualFormat(
    "H:[view2(50)]", 
    options: NSLayoutFormatOptions(rawValue:0), 
    metrics: nil, 
    views: viewsDictionary)
let view2_constraint_V = NSLayoutConstraint.constraintsWithVisualFormat(
    "V:[view2(>=40)]",
    options: NSLayoutFormatOptions(rawValue:0), 
    metrics: nil, views: viewsDictionary)

view2.addConstraints(view2_constraint_H)
view2.addConstraints(view2_constraint_V)

This is the same as the code for the first view, with one exception. The format string in line 3 is "V:[view2(<=40)]". We have a height of 40 pixels. We also have a <= stating it can be 40 points or bigger, should the constraints call for it. When we place view2 we’ll place it to extend all the way to the bottom of the super view. By writing it this way, it does not matter what device or orientation we are on. Auto Layout will figure out how high to make view2.

Arrange the Views

Build and Run.

Screenshot 2014-07-25 05.39.47

There are two shy little views cowering in the corner. The corner is coordinate (0,0) and they are hiding there since we have given no position constraints. Add the following:

//position constraints

//views
let view_constraint_H = NSLayoutConstraint.constraintsWithVisualFormat(
    "H:|-[view2]", 
    options: NSLayoutFormatOptions(rawValue:0), 
    metrics: nil, views: viewsDictionary)
let view_constraint_V = NSLayoutConstraint.constraintsWithVisualFormat(
    "V:|-36-[view1]-8-[view2]-0-|", 
    options: NSLayoutFormatOptions.AlignAllLeading, 
    metrics: nil, views: viewsDictionary)

view.addConstraints(view_constraint_H)
view.addConstraints(view_constraint_V)

As in our size constraints, we use the same method constraintsWithVisualFormat(). We have two different format strings and the options in line 5 is now NSLayoutFormatOptions.AlignAllLeading. We add these constraints to view, not view1 and view2 for positioning constraints. We add to the closest parent of the views.

Line 2’s format string "H:|-[view2]" is a horizontal string that sets view2 a standard width away from the left edge of the superview. The | is the edge of the superview, the - means a standard width between the superview and view2. Line 3’s format string is "V:|-36-[view1]-8-[view2]-0-|". In a vertical string, the beginning of the string is the top and the end is the bottom. While in line three we did not specify the right, here we specify top and bottom. The -36- and -0- are the same as - in line 2, but specify how many points apart the view and super view are. The -8- staes the views should be 8 points away from each other. So if we were to read this in plain language we have view1 36 points below the top of the superview, 8 points between view1 and view2 and no space between view2 and the bottom. Since view2 can stretch in height, this will turn view2 into a stripe down the entire view.

Looking at the code, we did not specify a horizontal position in the visual language for view1. We used an alignment to do this. The constant NSLayoutFormatOptions.AlignAllLeading in the options: parameter of line 5 does this, aligning the two views on their leading side.

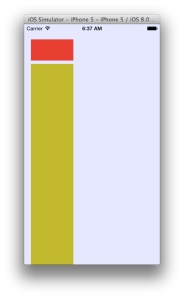
Build and run. we now have a square and a stripe.

Screenshot 2014-07-25 06.21.24

Rotate the device in the simulator with command and right or left arrow, and you have a shorter stripe.

Screenshot 2014-07-26 20.52.27

A Little Bit About Metrics

We have been using literal numbers in our code to specify widths and spacing. We don’t have to. We can use identifiers. That is what the metrics: parameter is all about. The metrics: parameter refers to a dictionary with keys and values we can use for those spacing and sizes. Add the following line under viewsDictionary

let metricsDictionary = [
    "view1Height": 50.0,
    "view2Height":40.0,
    "viewWidth":50.0 ]

This sets a dictionary of heights and widths for the views. We are keeping the widths the same so we use one value. Now change our sizing code to use this in the visual format and in options: to this:

//sizing constraints

//view1
let view1_constraint_H = NSLayoutConstraint.constraintsWithVisualFormat(
    "H:[view1(viewWidth)]", 
    options: NSLayoutFormatOptions(rawValue:0), 
    metrics: metricsDictionary, 
    views: viewsDictionary)
let view1_constraint_V = NSLayoutConstraint.constraintsWithVisualFormat(
    "V:[view1(view1Height)]", 
    options: NSLayoutFormatOptions(rawValue:0), 
    metrics: metricsDictionary, 
    views: viewsDictionary)

view1.addConstraints(view1_constraint_H)
view1.addConstraints(view1_constraint_V)
//view2
let view2_constraint_H = NSLayoutConstraint.constraintsWithVisualFormat(
    "H:[view2(viewWidth)]", 
    options: NSLayoutFormatOptions(rawValue:0), 
    metrics: metricsDictionary, 
    views: viewsDictionary)
let view2_constraint_V = NSLayoutConstraint.constraintsWithVisualFormat(
    "V:[view2(>=view2Height)]", 
    options: NSLayoutFormatOptions(rawValue:0), 
    metrics: metricsDictionary, 
    views: viewsDictionary)

view2.addConstraints(view2_constraint_H)
view2.addConstraints(view2_constraint_V)

Build and run, and you will see no change.

Screenshot 2014-07-25 06.21.24

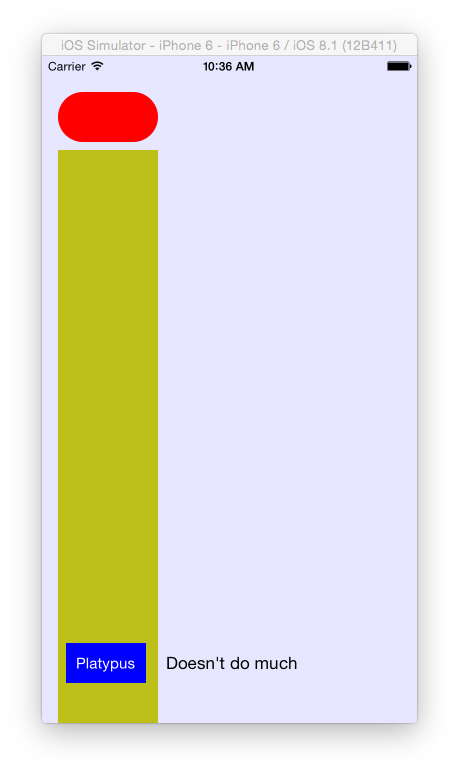
Change in the metrics dictionary "viewWidth":50.0 to "viewWidth":100.0 . Build and run again and we get a wider stripe.

Screenshot 2014-07-25 06.37.09 Screenshot 2014-07-26 20.53.42

Like anywhere else we use variables or constants instead of literals, this make changes to code a lot easier. For clarity in the rest of our examples I’ll use literals, but be aware using metrics is a good practice to get into.

Add the Button and Label

Views of colored backgrounds are cute, but they don’t do much. Adding some more useful controls would be nice. Let’s add a label and a button to our code. First we need a few constants declared. Just under the class definition, add the following constants:

//Make button and label
let button1:UIButton! = UIButton(type: .System)
let label1:UILabel! = UILabel()
let atRest = "Doesn't do much"
let atWork = "Secret Agent"

We declared two strings we’ll use in the target action for the button we’ll set up in a bit, a button and a label. We made a button and a label. Their scope is for the entire subclass, not just the methods like we did with the views. Declaring the label in Swift is just like declaring any other class: call its initializer, in this case UILabel(). For the button we have a initializer method UIButton(type:) which takes a constant from the struct UIButtonType. Most buttons will be UIButtonType.System.

Now we can add the label and button. Under the code making view2, add the following:

//Make a label
label1.text = atRest
label1.translatesAutoresizingMaskIntoConstraints = false

//Make a button
button1.translatesAutoresizingMaskIntoConstraints = false
button1.setTitle("Platypus", 
    forState: UIControlState.Normal)
button1.addTarget(self,
   action: "buttonPressed", 
   forControlEvents: UIControlEvents.TouchUpInside)
button1.backgroundColor = UIColor.blueColor()
button1.setTitleColor(UIColor.whiteColor(),
   forState: UIControlState.Normal)

view2.addSubview(button1)
view2.addSubview(label1)

Since we already instantiated the label and button, we need to set properties. For both, we set the translatesAutoresizingMaskIntoConstraints property to false to keep Auto Layout from barking at us later. Let’s look more closely at the addTarget() method

button1.addTarget(self,
    action: "buttonPressed", 
    forControlEvents: UIControlEvents.TouchUpInside)

This code tells Swift what method we will use when the event happens we use a selector. this is the equivalent of a control-Drag in the storyboard. In Swift, we use a string when identifying a selector, whihc is the method we will call on a TouchUpInside event. In our example, that method is "buttonPressed". This means we need a method buttonPressed. We’ll make a simple toggle. Add this method above viewDidLoad

func buttonPressed(){
    if label1.text == atRest{
        label1.text = atWork
    }else{
        label1.text = atRest
        }
}

To demonstrate Auto Layout on a hierarchy of views, we are going to add the controls to view2 instead of view. Add the following code just below view.addSubview(view2)


//controls
let control_constraint_H = NSLayoutConstraint.constraintsWithVisualFormat(
    "H:|-[button1(>=80)]-20-[label1(>=100)]",
    options: NSLayoutFormatOptions.AlignAllCenterY, 
    metrics: nil,
    views: viewsDictionary)
let control_constraint_V = NSLayoutConstraint.constraintsWithVisualFormat(
    "V:[button1]-40-|",
    options: NSLayoutFormatOptions(rawValue:0),
    metrics: nil, 
   views: viewsDictionary)

view2.addConstraints(control_constraint_H)
view2.addConstraints(control_constraint_V)

Instead of making separate sizing constraints, we joined them into the positioning constraints. We already have an example of vertical alignment, so here is an example of horizontal alignment. Our visual format strings are "H:|-[button1(>=80)]-20-[label1(>=100)]" and "V:[button1(40)]-40-|" with options: set to NSLayoutFormatOptions.AlignAllCenterY in line 2. Line 3 vertically lays out button1 40 points from the bottom of the superview with a height of 40. Line 2 places button1the standard distance from the left of the superview, then places label1 20 points to the right of that, and aligns both vertically to their centers. Line 2 also makes the button at least 80 points wide and the label at least 100 points wide.

Build and run. You will get a run-time error.

One More Bug

If you go through the exception that crashes the app, you will find towards the beginning:
'NSInvalidArgumentException',
reason: 'Unable to parse constraint format:
button1 is not a key in the views dictionary.

For our bug portion of this post, I wanted to share two of the common mistakes people make with setting up Auto Layout. One is forgetting to add a view to the view dictionary. Find your viewsDictionary code:

let viewsDictionary = [
    "view1":view1,
    "view2":view2]

The dictionary has no elements for button1 and label1. Change the dictionary to this.

let viewsDictionary = [
    "view1":view1,
    "view2":view2,
    "button1":button1,
    "label1":label1]

Build and run and you should see the app working:

Screenshot 2014-07-25 08.20.11 Screenshot 2014-07-25 08.20.17

The second error is the auto resizing mask. Comment out this line:

//view2.translatesAutoresizingMaskIntoConstraints = false

Build and run. The run-time error message begins

SwiftAutoLayout[1874:60997] Unable to simultaneously satisfy constraints.
Probably at least one of the constraints in the following list is one you don't want. Try this: (1) look at each constraint and try to figure out which you don't expect; (2) find the code that added the unwanted constraint or constraints and fix it.

This error message is for too many constraints on a view. If we align center label1 as we did above then set a vertical constraint that it is 10 points from the top of the superview, we have conflicting information. This error tells us we have constraint conflicts. Our format is correct in this case — or so it seems. If we don’t send the message setTranslatesAutoresizingMaskIntoConstraints(false) to view2 Auto Layout will create constraints for us. When we add our own they will always be too many. As I mentioned above always make setTranslatesAutoresizingMaskIntoConstraints() false when you are working programmatically with constraints. Uncomment the line again ad the app works perfectly.

That is the basics of setting up Auto Layout constraints in Swift. There is a lot more here to cover, but this is enough to get a developer busy working without a storyboard.

The Whole Code

The code is a single file this time. Here is all of it in working order.

//
//  ViewController.swift
//  SwiftProgrammaticAutoLayout
//
//  Created by Steven Lipton on 9/15/15.
//  Copyright © 2015 MakeAppPie.Com. All rights reserved.
//

import UIKit

class ViewController: UIViewController {
    //Make button and label
    let button1:UIButton! = UIButton(type: .System)
    let label1:UILabel! = UILabel()
    let atRest = "Doesn't do much"
    let atWork = "Secret Agent"
    func makeLayout(){
        //Make a view
        let view1 = UIView()
        view1.translatesAutoresizingMaskIntoConstraints = false
        view1.backgroundColor = UIColor.redColor()
        
        //Make a second view
        let view2 = UIView()
        view2.translatesAutoresizingMaskIntoConstraints = false
        view2.backgroundColor = UIColor(red: 0.75, green: 0.75, blue: 0.1, alpha: 1.0)
        
        //Add the views
        view.addSubview(view1)
        view.addSubview(view2)
        //--------------- constraints
        
        //make dictionary for views
        let viewsDictionary = ["view1":view1,"view2":view2,"button1":button1,"label1":label1]
        let metricsDictionary = ["view1Height": 50.0,"view2Height":40.0,"viewWidth":100.0 ]
        //sizing constraints
        //view1
        let view1_constraint_H = NSLayoutConstraint.constraintsWithVisualFormat("H:[view1(50)]", options: NSLayoutFormatOptions(rawValue: 0), metrics: metricsDictionary, views: viewsDictionary)
        let view1_constraint_V = NSLayoutConstraint.constraintsWithVisualFormat("V:[view1(50)]", options: NSLayoutFormatOptions(rawValue:0), metrics: metricsDictionary, views: viewsDictionary)
        
        view1.addConstraints(view1_constraint_H)
        view1.addConstraints(view1_constraint_V)
        
        //view2
        let view2_constraint_H = NSLayoutConstraint.constraintsWithVisualFormat("H:[view2(50)]", options: NSLayoutFormatOptions(rawValue:0), metrics: metricsDictionary, views: viewsDictionary)
        let view2_constraint_V = NSLayoutConstraint.constraintsWithVisualFormat("V:[view2(>=40)]", options: NSLayoutFormatOptions(rawValue:0), metrics: metricsDictionary, views: viewsDictionary)
        
        view2.addConstraints(view2_constraint_H)
        view2.addConstraints(view2_constraint_V)
        
        //position constraints
        
        //views
        let view_constraint_H = NSLayoutConstraint.constraintsWithVisualFormat("H:|-[view2]", options: NSLayoutFormatOptions(rawValue:0), metrics: nil, views: viewsDictionary)
        let view_constraint_V = NSLayoutConstraint.constraintsWithVisualFormat("V:|-36-[view1]-8-[view2]-0-|", options: NSLayoutFormatOptions.AlignAllLeading, metrics: nil, views: viewsDictionary)
        
        view.addConstraints(view_constraint_H)
        view.addConstraints(view_constraint_V)
        
        //Make a label
        label1.text = atRest
        label1.translatesAutoresizingMaskIntoConstraints = false
        
        
        //Make a button
        button1.translatesAutoresizingMaskIntoConstraints = false
        button1.setTitle("Platypus", forState: UIControlState.Normal)
        button1.addTarget(self, action: "buttonPressed", forControlEvents: UIControlEvents.TouchUpInside)
        button1.backgroundColor = UIColor.blueColor()
        button1.setTitleColor(UIColor.whiteColor(), forState: UIControlState.Normal)
        
        
        view2.addSubview(button1)
        view2.addSubview(label1)
        
        //controls
        let control_constraint_H = NSLayoutConstraint.constraintsWithVisualFormat("H:|-[button1(>=80)]-20-[label1(>=100)]", options: NSLayoutFormatOptions.AlignAllCenterY, metrics: nil, views: viewsDictionary)
        
        let control_constraint_V = NSLayoutConstraint.constraintsWithVisualFormat("V:[button1]-40-|", options: NSLayoutFormatOptions(rawValue:0), metrics: nil, views: viewsDictionary)
        
        view2.addConstraints(control_constraint_H)
        view2.addConstraints(control_constraint_V)
        
    }
    
    func buttonPressed(){
        if label1.text == atRest{
            label1.text = atWork
        }else{
            label1.text = atRest
        }
    }
    
    override func viewDidLoad() {
        super.viewDidLoad()
        // Do any additional setup after loading the view, typically from a nib.
        view.backgroundColor = UIColor(red: 0.9, green: 0.9, blue: 1, alpha: 1.0)
        makeLayout()
    }
    

    override func supportedInterfaceOrientations() -> UIInterfaceOrientationMask {
        return UIInterfaceOrientationMask.All
    }
}


54 responses to “The Swift Swift Tutorial: How To Use UIViews With Auto Layout Programmatically”

  1. […] either as a scene in a storyboard or a .xib file to build their views.  A developer can programmatically create a view class to hold the different controls.The view for the pizza order app in a […]

  2. Awesome tutorial! I would love to see more tutorials on building iOS apps completely programmatically in Swift!. It seems that a lot of serious developers dislike using Storyboards, so it would definitely be appreciated since almost every other Swift tutorial I’ve seen so far uses Storyboards.

    Thanks again – this was really helpful.

    1. Thank you for the compliment!!

      I’ll be doing a few more like this, because it is the only way I can stand autolayout. Definitely one on Split View programmatically will be coming up this month or next month since it seems it is the only way in Swift to get it to work nicely without a lot of messing with optional values. I’m also going to do one or two Swift versions of my earlier Objective-C posts Life Without Storyboards about using Sprite Kit for more than just games – though a different application.

  3. […] covered most of the view programming in another tutorial. For compactness, I’m leaving out auto layout and setting the position by setting the frame. […]

  4. Thanks for posting this. If you are trying to do anything complicated, story boards don’t hold up well. Looking forward to your split view tutorial.

    1. I got modals popovers and xibs stuff too. Just keep reading.

  5. Hi Steven,

    I am following all your tutorials They are great. Thanks a lot,

    I am trying to add a constraint for a very simple purpose: Add a background image in an universal app. The same picture is used for iPhone, iPad, portrait or landscape mode.

    In Main story board, I just added an image view, located at top left of the view, then added a constraint “Equal height” hoping that the picture will be cropped horizontally depending on the width of the device,

    It seems working for iPad. but for iPhone, the image seems to be shrink.

    Do you have an idea what is wrong in which I done?

    Thanks a lot,

    Jilu.

    1. Very good question. One of those headaches that keep me away from Auto Layout. I’m not sure myself without checking. I know I ran into that problem in one of the demo apps. Let me check on that and I’ll reply back to you shortly.

      1. You have to set the contentMode property of the imageview according to how you want it to display the image. Its default value is UIViewContentModeScaleToFil, but you usually want to set it UIViewContentModeCenter.

  6. Hi Steven, really excellent tutorial – question:

    I’m wanting to set the corner radius of the view, relative to the view width, but accessing view1.frame.width gives me a 0 – what am I missing?

    1. Autolayout happens after viewDidAppear. What that means is without using some methods that are a bit dangerous to use, you can’t get the width that way. There are methods on UIview that work with constraints, but i’ve never used them. This is one of those times where skipping autolayout might be prudent.

  7. Hi Steve, thanks for really great tutorial – question:

    If I want to set the view’s corner radius, based on the view width, I try retrieving view1.frame.width but get a 0 – what am I missing?

    1. Thinking about it last night the whole issue of sizing with autolayout might make a good blog entry….Stay tuned. Can’t guarantee anything for a few weeks but I’ll look into it.

  8. Thaks Steve – I posted the question on stackoverflow – http://stackoverflow.com/a/26578909/1117715 – and got an answer from another Steve:

    override func viewDidLayoutSubviews() {
    println(self.view1.frame.size)
    }

  9. Thanks!
    zag’s solution didn’t work for me.

    1. Sorry for the delay in answering — I’m way behind in a bunch of projects. What was not working?

      1. Not a question from me. But, from zag about setting a corner radius based on a view’s width. It caught my interest, and he posted the answer to his own question. However, as it threw an error when I ran it, I wonder how it worked (assuming it did) for zag.

  10. Hi Stephen et al.

    Can you help with this? I get a console message that begins: “Unable to simultaneously satisfy constraints. . . ”

    I have gone gray, and then bald trying to fathom it.

    Thanks in anticipation.

    -u

    //
    // ViewController.swift
    // WeatherLayout_exercise
    //
    // Created by apple_2 on 19/12/2014.
    // Copyright (c) 2014 ugajin. All rights reserved.
    //

    import UIKit

    class ViewController: UIViewController {

    override func viewDidLoad() {
    super.viewDidLoad()

    view.backgroundColor = UIColor.blackColor()

    let view1 = UIView()
    view1.setTranslatesAutoresizingMaskIntoConstraints(false)
    view1.layer.borderColor = UIColor.whiteColor().CGColor
    view1.layer.borderWidth = 1.0
    view.addSubview(view1)

    let view2 = UIView()
    view2.setTranslatesAutoresizingMaskIntoConstraints(false)
    view2.layer.borderColor = UIColor.whiteColor().CGColor
    view2.layer.borderWidth = 1.0
    view1.addSubview(view2)

    // viewsDictionary
    let viewsDictionary = [“view1”:view1, “view2”:view2 ]

    // constraints

    //views
    let view1_constraint_H:NSArray = NSLayoutConstraint.constraintsWithVisualFormat(“H:|-(32)-[view1]-(32)-|”, options: NSLayoutFormatOptions.AlignAllCenterY, metrics: nil, views: viewsDictionary)
    let view1_constraint_V:NSArray = NSLayoutConstraint.constraintsWithVisualFormat(“V:|-(32)-[view1]-(32)-|”, options: NSLayoutFormatOptions.AlignAllCenterX, metrics: nil, views: viewsDictionary)

    view.addConstraints(view1_constraint_H)
    view.addConstraints(view1_constraint_V)

    let view2_constraint_H:NSArray = NSLayoutConstraint.constraintsWithVisualFormat(“H:[view1][view2(100)]”, options: NSLayoutFormatOptions.AlignAllCenterY, metrics: nil, views: viewsDictionary)
    let view2_constraint_V:NSArray = NSLayoutConstraint.constraintsWithVisualFormat(“V:[view1][view2(100)]”, options: NSLayoutFormatOptions.AlignAllCenterX, metrics: nil, views: viewsDictionary)

    view1.addConstraints(view2_constraint_H)
    view1.addConstraints(view2_constraint_V)
    }

    override func didReceiveMemoryWarning() {
    super.didReceiveMemoryWarning()
    // Dispose of any resources that can be recreated.
    }

    //Hide the status bar
    override func prefersStatusBarHidden() -> Bool {
    return true;
    }
    }

  11. sorry. I’m on the road and cant look at anybody’s programs right now.

  12. Just wanted to say THANK YOU SO MUCH! I have been banging my head off the desk for a month trying to figure out how to auto layout working programatically in Swift and finally I have something that works. All I need now is to figure out how to get my iAd banner to disappear and reappear nicely. Thanks again!

    1. Thank you for the compliment!!
      Don’t know much about iAd. Tried it last year on a spriteKit game. Made $1.50 all year. I know there’s a flag in the viewcontroller. Here’s my notes if they help:

      step 1: add the frame work to the build phases
      Step 2: add to the header for the view controller n the implementation file:

      #import <iAd/iAd.h>

      then in viewDidLoad, change one property:

      //set up iad
          self.canDisplayBannerAds = YES;
      

      It is important that for sprite kit this is located as the last thing in viewDidLoad. Set up everything else first. If you don’t, then there will be a fatal error. This is due to iAd taking everything that is in the view and making it a subview. I have not yet learned how to use that subview, so for the moment at least all the ducks need to be set up before you call iad.

  13. […] to fit the content I put into in. After digging around on the web I found a video tutorial and a blog post that explained in part how to do this. Then I started experimenting with LayoutConstraints. These […]

  14. forrestmaready Avatar
    forrestmaready

    Thanks for this excellent article. In the walkthrough, you skipped adding the Button and Label to the subView. The final code has it in the end, but it’s not shown anywhere else. Might trip up some beginners.

    1. thanks. I’ll take a look at it.

  15. […] Builder either as a scene in a storyboard or a .xib file to build their views.  A developer can programmatically create a view class to hold the different […]

  16. Steve,

    When I set setTranslatesAutoresizingMaskIntoConstraints(false), no user interaction happens, even if I set userInteractionEnabled explicitly and programmatically add the event code.

    I am not using ANY constraints.

    Do you know what could be causing such a thing?

    If I set setTranslatesAutoresizingMaskIntoConstraints(true), all user interaction works great.

    Thanks

    1. There are always constraints, even if you are not using them. The system assigns them. That mask’s sole purple purpose is to make sure those constraints that you didn’t put a constraint on have one. When not using programmatic constraints, it’s best to leave the mask alone.

  17. Thank you for the tutorial

  18. Hi Steve,

    If you have a chance, take a look at this project on GitHub:

    https://github.com/gk-brown/MarkupKit

    It’s an iOS framework that, among other things, significantly simplifies the process of using auto-layout programmatically. It provides several UIView subclasses that manage the details of installing and configuring constraints for you so your code doesn’t need to deal with them directly. An abbreviated introduction to some of the key features is available here:

    https://gkbrown.wordpress.com/2015/07/14/introducing-markupkit/

    As the author of the project, I realize that this is a bit of a shameless plug, but, like you, I prefer to build UIs programmatically but find working with constraints very cumbersome. One of the main reasons I created the project was to help simplify that task.

    Greg

  19. Steven – awesome tutorial and very helpful site, thank you so much for your hard work! I just went through this and got all the code working with Swift 2 in Xcode Beta 6. Major change was that translatesAutoresizingMaskIntoConstraints is now a variable, other changes were mostly casting errors. Here is my code, hope it helps anyone working in Swift 2:

    import UIKit

    class ViewController: UIViewController {

    // Note: you could set up these views like this, which is closer to their Obj-C counterparts:
    // var label1:UILabel! = UILabel() as! UILabel
    // var button1:UIButton! = UIButton.buttonWithType(UIButtonType.System) as! UIButton
    // also, if we wanted a type AnyObject! we could do this:
    // let button1:AnyObject! = UIButton.buttonWithType(UIButtonType.System)

    let button1 = UIButton(type: UIButtonType.System)
    let label1 = UILabel()
    let atRest = “Doesn’t do much”
    let atWork = “Secret Agent”

    func makeLayout(){

    //Make a view
    let view1 = UIView()
    view1.translatesAutoresizingMaskIntoConstraints = false
    view1.backgroundColor = UIColor.redColor()

    //Make a second view
    let view2 = UIView()
    view2.translatesAutoresizingMaskIntoConstraints = false
    view2.backgroundColor = UIColor(red: 0.75, green: 0.75, blue: 0.1, alpha: 1.0)

    //Make a label
    label1.text = atRest
    label1.translatesAutoresizingMaskIntoConstraints = false

    //Make a button
    button1.translatesAutoresizingMaskIntoConstraints = false
    button1.setTitle(“Platypus”, forState: UIControlState.Normal)
    button1.addTarget(self, action: “buttonPressed”, forControlEvents: UIControlEvents.TouchUpInside)
    button1.backgroundColor = UIColor.blueColor()
    button1.setTitleColor(UIColor.whiteColor(), forState: UIControlState.Normal)

    view.addSubview(view1)
    view.addSubview(view2)
    view2.addSubview(button1)
    view2.addSubview(label1)

    //make dictionary for views
    let viewsDictionary = [“view1″:view1,”view2”:view2, “button1″:button1,”label1”:label1]
    let metricsDictionary = [“view1Height”: 50.0,”view2Height”:40.0,”viewWidth”:100.0 ]

    //controls
    let control_constraint_H:NSArray = NSLayoutConstraint.constraintsWithVisualFormat(“H:|-[button1(>=80)]-20-[label1(>=100)]”, options: NSLayoutFormatOptions.AlignAllCenterY, metrics: nil, views: viewsDictionary)
    let control_constraint_V:NSArray = NSLayoutConstraint.constraintsWithVisualFormat(“V:[button1]-40-|”, options: NSLayoutFormatOptions(rawValue: 0), metrics: nil, views: viewsDictionary)

    view2.addConstraints(control_constraint_H as! [NSLayoutConstraint])
    view2.addConstraints(control_constraint_V as! [NSLayoutConstraint])

    //————— constraints

    //sizing constraints
    //view1

    /*
    // See code directly below this commented section which uses the metricsDictionary

    let view1_constraint_H:Array = NSLayoutConstraint.constraintsWithVisualFormat(“H:[view1(50)]”, options: NSLayoutFormatOptions(rawValue: 0), metrics: nil, views: viewsDictionary)
    let view1_constraint_V:Array = NSLayoutConstraint.constraintsWithVisualFormat(“V:[view1(50)]”, options: NSLayoutFormatOptions(rawValue: 0), metrics: nil, views: viewsDictionary)

    view1.addConstraints(view1_constraint_H as [NSLayoutConstraint])
    view1.addConstraints(view1_constraint_V as [NSLayoutConstraint])

    //view2
    let view2_constraint_H:NSArray = NSLayoutConstraint.constraintsWithVisualFormat(“H:[view2(50)]”, options: NSLayoutFormatOptions(rawValue: 0), metrics: nil, views: viewsDictionary)
    let view2_constraint_V:NSArray = NSLayoutConstraint.constraintsWithVisualFormat(“V:[view2(>=40)]”, options: NSLayoutFormatOptions(rawValue: 0), metrics: nil, views: viewsDictionary)

    view2.addConstraints(view2_constraint_H as! [NSLayoutConstraint])
    view2.addConstraints(view2_constraint_V as! [NSLayoutConstraint])
    */

    //view1
    let view1_constraint_H:Array = NSLayoutConstraint.constraintsWithVisualFormat(“H:[view1(viewWidth)]”, options: NSLayoutFormatOptions(rawValue: 0), metrics: metricsDictionary, views: viewsDictionary)
    let view1_constraint_V:Array = NSLayoutConstraint.constraintsWithVisualFormat(“V:[view1(view1Height)]”, options: NSLayoutFormatOptions(rawValue: 0), metrics: metricsDictionary, views: viewsDictionary)

    view1.addConstraints(view1_constraint_H as [NSLayoutConstraint])
    view1.addConstraints(view1_constraint_V as [NSLayoutConstraint])
    //view2
    let view2_constraint_H:NSArray = NSLayoutConstraint.constraintsWithVisualFormat(“H:[view2(viewWidth)]”, options: NSLayoutFormatOptions(rawValue: 0), metrics: metricsDictionary, views: viewsDictionary)
    let view2_constraint_V:NSArray = NSLayoutConstraint.constraintsWithVisualFormat(“V:[view2(>=view2Height)]”, options: NSLayoutFormatOptions(rawValue: 0), metrics: metricsDictionary, views: viewsDictionary)

    view2.addConstraints(view2_constraint_H as! [NSLayoutConstraint])
    view2.addConstraints(view2_constraint_V as! [NSLayoutConstraint])

    //position constraints

    //views
    let view_constraint_H:NSArray = NSLayoutConstraint.constraintsWithVisualFormat(“H:|-[view2]”, options: NSLayoutFormatOptions(rawValue: 0), metrics: nil, views: viewsDictionary)
    let view_constraint_V:NSArray = NSLayoutConstraint.constraintsWithVisualFormat(“V:|-36-[view1]-[view2]-0-|”, options: NSLayoutFormatOptions.AlignAllLeading, metrics: nil, views: viewsDictionary)

    view.addConstraints(view_constraint_H as! [NSLayoutConstraint])
    view.addConstraints(view_constraint_V as! [NSLayoutConstraint])

    }

    func buttonPressed(){
    if label1.text == atRest{
    label1.text = atWork
    }else{
    label1.text = atRest
    }
    }

    override func viewDidLoad() {
    super.viewDidLoad()

    // Do any additional setup after loading the view, typically from a nib.
    view.backgroundColor = UIColor(red: 0.9, green: 0.9, blue: 1, alpha: 1.0)
    makeLayout()
    // Do any additional setup after loading the view, typically from a nib.
    }

    override func supportedInterfaceOrientations() -> UIInterfaceOrientationMask {
    return UIInterfaceOrientationMask.All
    }

    override func didReceiveMemoryWarning() {
    super.didReceiveMemoryWarning()
    // Dispose of any resources that can be recreated.
    }

    }

    1. I will be updating this myself shortly. Thanks for the heads up.

  20. I created an application to pure code other elements are resized as do tests on different simulators , but one element is not positioned automatically , how I add the appropriate constraints to be always positioned on the right bank of the devices and resize each type of resolution , obviously I can not add the constraints dynamically as everything was done with code , how it should do this but with code.

    Beforehand thank you very much

    This is my code

    import UIKit
    
      class ViewController: UIViewController {
    
        let scrollView = UIScrollView(frame: UIScreen.mainScreen().bounds)
    
    override func loadView() {
        // calling self.view later on will return a UIScrollView!, but we can simply call
        // self.scrollView to adjust properties of the scroll view:
        self.view = self.scrollView
    
        // setup the scroll view
        scrollView.backgroundColor = UIColor.whiteColor()
        // etc...
    }
    
    override func viewDidLoad() {
        super.viewDidLoad()
    
        var value:CGFloat = 89.0
        var total = 10
        for var index = 0; index &lt; total; ++index {
            //View  verde
            var DynamicView=UIView(frame: CGRectMake(0, value, scrollView.frame.size.width, 198))
            DynamicView.backgroundColor=UIColor.greenColor()
            scrollView.addSubview(DynamicView)
    
            //Imagenn Fondo  rojo
            var fondo :UIImageView
            fondo = UIImageView(frame:CGRectMake(0, 0, scrollView.frame.size.width, 198))
            fondo.image = UIImage(named:&quot;catedral.jpg&quot;)
            fondo.backgroundColor=UIColor.redColor()
            DynamicView.addSubview(fondo)
    
            //Labels Nombre y Dirección texto blanco
            var nombreLabel=UILabel(frame: CGRect(x: 8,y: 23,width: 304,height: 21))
            nombreLabel.text=&quot;Nombre Negocio&quot;
            nombreLabel.font = UIFont(name: nombreLabel.font.fontName, size: 20)
            nombreLabel.textColor=UIColor.whiteColor()
            DynamicView.addSubview(nombreLabel)
            var direccionLabel=UILabel(frame: CGRect(x: 8,y: 44,width: 304,height: 21))
            direccionLabel.text=&quot;Dirección Negocio&quot;
            direccionLabel.font = UIFont(name: nombreLabel.font.fontName, size: 13)
            direccionLabel.textColor=UIColor.whiteColor()
            DynamicView.addSubview(direccionLabel)
    
            //Puntuación  gris
            var puntuacion:UIImageView!
            puntuacion = UIImageView(frame: CGRectMake(282, 8, 30, 30))
            //puntuacion.image = UIImage(named:&quot;7&quot;)
            puntuacion.backgroundColor=UIColor.grayColor()
            DynamicView.addSubview(puntuacion)
    
            //Botones  blanco
            var button1:UIButton = UIButton(frame: CGRectMake(8, 114, 32, 32))
            button1.addTarget(self, action: &quot;button1:&quot;, forControlEvents: UIControlEvents.TouchUpInside)
            button1.backgroundColor=UIColor.whiteColor()
            DynamicView.addSubview(button1)
            button1.setImage(UIImage(named: &quot;marker&quot;), forState: UIControlState.Normal)
    
            var button2:UIButton = UIButton(frame: CGRectMake(48, 114, 32, 32))
            button2.addTarget(self, action: &quot;button2:&quot;, forControlEvents: UIControlEvents.TouchUpInside)
            button2.backgroundColor=UIColor.whiteColor()
            DynamicView.addSubview(button2)
            button2.setImage(UIImage(named: &quot;marker&quot;), forState: UIControlState.Normal)
    
            var button3:UIButton = UIButton(frame: CGRectMake(88, 114, 32, 32))
            button3.addTarget(self, action: &quot;button3:&quot;, forControlEvents: UIControlEvents.TouchUpInside)
            button3.backgroundColor=UIColor.whiteColor()
            DynamicView.addSubview(button3)
            button3.setImage(UIImage(named: &quot;marker&quot;), forState: UIControlState.Normal)
    
            //Cenefa Info  gris
            var cenefa :UIImageView
            cenefa = UIImageView(frame:CGRectMake(0, 150, scrollView.frame.size.width, 48))
            cenefa.backgroundColor=UIColor.grayColor()
            cenefa.alpha=1
            DynamicView.addSubview(cenefa)
    
            //Info Ccenefa  amarillo
            var descripcion=UILabel(frame: CGRect(x: 2,y: 0,width: scrollView.frame.size.width, height: 45))
            descripcion.backgroundColor=UIColor.yellowColor()
            descripcion.text=&quot;Descripcion Negocio&quot;
            descripcion.font = UIFont(name: nombreLabel.font.fontName, size: 10)
            descripcion.textColor=UIColor.blueColor()
            cenefa.addSubview(descripcion)
    
            value=value+200.0
    
        }
        scrollView.contentSize=CGSizeMake(scrollView.frame.size.width, 2089)
    
    }
    
    override func didReceiveMemoryWarning() {
        super.didReceiveMemoryWarning()
        // Dispose of any resources that can be recreated.
    }
     
    This code place a gray square but this not alignment correctly in Iphone 6 and plus this is the code
    
    //Cenefa Info  gris
            var cenefa :UIImageView
            cenefa = UIImageView(frame:CGRectMake(0, 150, scrollView.frame.size.width, 48))
            cenefa.backgroundColor=UIColor.grayColor()
            cenefa.alpha=1
            DynamicView.addSubview(cenefa)
    

    Can you help me, please.

    1. Since there is no Autolayout in this code, I would not know where to begin. Here is what I suggest: understand Autolayout on the storyboard first, then re-read this section. if you look at my Autolayout posts or buy the Practical Autolayout book you should have an good understanding to solve your problem yourself.

  21. […] The Swift Swift Tutorial: How To Use UIViews With Auto Layout Programmatically […]

  22. This tutorial is an excellent introduction to using AutoLayout programmatically. It helped me out a lot with a project I’m finishing up. While I think I’ll likely end up using SnapKit or Neon in the future it’s good to what code those libraries are abstracting.

    1. Hi Damian,

      You might also want to check out MarkupKit. It’s an open-source project I created to simplify iOS app development. Rather than creating constraints programmatically, you declare the layout of your UI in markup, similar to XAML. It works in iOS 8 and above, but it also supports the new UIStackView class Apple added in iOS 9. See this article for an example:

      https://dzone.com/articles/using-uistackview-with-markupkit

      The project site is here:

      https://github.com/gk-brown/MarkupKit

      Hope you find it useful,
      Greg

  23. Thanks for great tutorial. I’ve got a question:

    What’s the best method to show content like Facebook News Feed? There are a lot Custom Cell types with similar item like avatar, title in top; Like, Comment, Share buttons in bottom. But they have different Main Content, example: Photo feed is different with Note feed. I don’t think they will create a custom Cell for each different Feed type, because if they want to add more line (example comment number), they have to change all layout and code for all custom Cell.

    1. Good question. Haven’t done it myself, but most likely They use custom cells but dynamically assign them in the tableview:cellForRowAtIndexPath: data source of the table view. The custom cells are set up with auto layout and a few of the UITableViewDelegates to size everything dynamically. I haven’t written a post on custom cells or dynamically using them. I’ll have to do that soon.

      1. Thank you for your reply. I can’t wait to see your new tutorial about custom cell. Actually, the real question for my issue is how to initialize custom UIView from nib file with auto layout and insert it to custom UITableViewCell. I posted my code and project in stackoverflow but didn’t see any helps. Can you go through it and give me some ideas to resolve it? Thank you very much again.

    2. Take a look at this article (I’m the author):

      https://dzone.com/articles/creating-custom-table-view-cells-in-markup

      The article only describes a single custom layout, but you could easily create a single cell type that uses multiple layouts, each of which would be defined in their own layout document.

      1. Hi Greg,

        Thank you for your reply. MarkupKit will be a great framework. But for my project, my custom views have very complex subviews and with auto layout and priority, we can remove a subview and still show right layout for them. Can you read my detail question and give me some ideas about it: http://stackoverflow.com/questions/33424181/use-auto-layout-to-create-uitableview-with-multiple-different-custom-cells-have

        I think MarkupKit is very great. Hope that I can use it in next project. Thank you very much.

        Best regards,
        Nick

  24. Hi Nick,

    MarkupKit’s LMRowView and LMColumnView classes can be used to create complex layouts. They are similar to the new UIStackView class, but they have a couple features that UIStackView doesn’t have, such as the ability to set a background color and weight-based distribution. They also work in iOS 8 (UIStackView requires iOS 9).

    MarkupKit also supports UIStackView. See this article for more information:

    https://dzone.com/articles/using-uistackview-with-markupkit

    All three classes (LMRowView, LMColumnView, and UIStackView) allow you to dynamically update their contents at runtime using the addArrangedSubview: and removeArrangedSubview: methods.

    I’ll take a look at your SO post and see if I can offer any suggestions there.

    Greg

  25. […] I’ll leave this code as-is. It works fine for a template to use the entire view for a stack View. If you want to know more about Auto layout in code, see my post on it. […]

  26. THIS IS AWESOME!!! There’s no diagrams of how these things all work together, and Xcode’s Storyboards are than Adobe Illustrator in terms of arcane and nonsensical UI/UX. So I’m left with only the aid of brilliant breakdowns like this to see how things actually work.

    THANK YOU!!!

  27. […] Builder either as a scene in a storyboard or a .xib file to build their views.  A developer can programmatically create a view class to hold the different […]

  28. Hello, I really like this tutorial a lot. Thank you for the effort on writing it :)
    Unfortunately, with the constant changes in Swift, the codes are a bit out-of-date. in Xcode 8.3.2 Swift 3. The complete code comes up with a lot of warnings and errors.

    here is one that is up to date
    import UIKit

    class ViewController: UIViewController {
    //Make button and label
    let button1:UIButton! = UIButton(type: .system)
    let label1:UILabel! = UILabel()
    let atRest = “Doesn’t do much”
    let atWork = “Secret Agent”
    func makeLayout(){
    //Make a view
    let view1 = UIView()
    view1.translatesAutoresizingMaskIntoConstraints = false
    view1.backgroundColor = UIColor.red

    //Make a second view
    let view2 = UIView()
    view2.translatesAutoresizingMaskIntoConstraints = false
    view2.backgroundColor = UIColor(red: 0.75, green: 0.75, blue: 0.1, alpha: 1.0)

    //Add the views
    view.addSubview(view1)
    view.addSubview(view2)
    //————— constraints

    //make dictionary for views
    let viewsDictionary = [“view1″:view1,”view2″:view2,”button1″:button1,”label1”:label1]
    let metricsDictionary = [“view1Height”: 50.0,”view2Height”:40.0,”viewWidth”:100.0 ]
    //sizing constraints
    //view1
    let view1_constraint_H = NSLayoutConstraint.constraints(withVisualFormat: “H:[view1(50)]”, options: NSLayoutFormatOptions(rawValue: 0), metrics: metricsDictionary, views: viewsDictionary)
    let view1_constraint_V = NSLayoutConstraint.constraints(withVisualFormat: “V:[view1(50)]”, options: NSLayoutFormatOptions(rawValue:0), metrics: metricsDictionary, views: viewsDictionary)

    view1.addConstraints(view1_constraint_H)
    view1.addConstraints(view1_constraint_V)

    //view2
    let view2_constraint_H = NSLayoutConstraint.constraints(withVisualFormat: “H:[view2(50)]”, options: NSLayoutFormatOptions(rawValue:0), metrics: metricsDictionary, views: viewsDictionary)
    let view2_constraint_V = NSLayoutConstraint.constraints(withVisualFormat: “V:[view2(>=40)]”, options: NSLayoutFormatOptions(rawValue:0), metrics: metricsDictionary, views: viewsDictionary)

    view2.addConstraints(view2_constraint_H)
    view2.addConstraints(view2_constraint_V)

    //position constraints

    //views
    let view_constraint_H = NSLayoutConstraint.constraints(withVisualFormat: “H:|-[view2]”, options: NSLayoutFormatOptions(rawValue:0), metrics: nil, views: viewsDictionary)
    let view_constraint_V = NSLayoutConstraint.constraints(withVisualFormat: “V:|-36-[view1]-8-[view2]-0-|”, options: NSLayoutFormatOptions.alignAllLeading, metrics: nil, views: viewsDictionary)

    view.addConstraints(view_constraint_H)
    view.addConstraints(view_constraint_V)

    //Make a label
    label1.text = atRest
    label1.translatesAutoresizingMaskIntoConstraints = false

    //Make a button
    button1.translatesAutoresizingMaskIntoConstraints = false
    button1.setTitle(“button”, for: UIControlState.normal)
    button1.addTarget(self, action: #selector(ViewController.buttonPressed), for: UIControlEvents.touchUpInside)
    button1.backgroundColor = UIColor.blue
    button1.setTitleColor(UIColor.white, for: UIControlState.normal)

    view2.addSubview(button1)
    view2.addSubview(label1)

    //controls
    let control_constraint_H = NSLayoutConstraint.constraints(withVisualFormat: “H:|-[button1(>=80)]-20-[label1(>=100)]”, options: NSLayoutFormatOptions.alignAllCenterY, metrics: nil, views: viewsDictionary)

    let control_constraint_V = NSLayoutConstraint.constraints(withVisualFormat: “V:[button1]-40-|”, options: NSLayoutFormatOptions(rawValue:0), metrics: nil, views: viewsDictionary)

    view2.addConstraints(control_constraint_H)
    view2.addConstraints(control_constraint_V)

    }

    func buttonPressed(){
    if label1.text == atRest{
    label1.text = atWork
    }else{
    label1.text = atRest
    }
    }

    override func viewDidLoad() {
    super.viewDidLoad()
    // Do any additional setup after loading the view, typically from a nib.
    view.backgroundColor = UIColor(red: 0.9, green: 0.9, blue: 1, alpha: 1.0)
    makeLayout()
    }

    /* override func supportedInterfaceOrientations() -> UIInterfaceOrientationMask {
    return UIInterfaceOrientationMaskall
    } */
    }
    I managed to correct most of them except one:
    override func supportedInterfaceOrientations() -> UIInterfaceOrientationMask {
    return UIInterfaceOrientationMaskall
    }
    It gives me a warning but I am not sure how to fix it.

    1. Thanks for the update !!

  29. […] été à la suite d'une mise en page automatique tutoriel par MakeAppPie et a ajouté view1.layer.cornerRadius = view1.bounds.width/2 comme ci-dessous, mais cela n'a eu […]

  30. […] estado siguiendo un diseño automático tutorial por MakeAppPie y añadió view1.layer.cornerRadius = view1.bounds.width/2 como abajo, pero esto no tuvo ningún […]

  31. […] seguito un layout automatico tutorial da MakeAppPie e aggiunto view1.layer.cornerRadius = view1.bounds.width/2 come di seguito, ma questo non ha avuto […]

Leave a comment

This site uses Akismet to reduce spam. Learn how your comment data is processed.