Navigation controllers are the workhorse of organizing view controllers. I’ve covered much of their use in other posts about MVC, segues and delegates. In this chapter, we’ll go through some of the Swift code for the Navigation controller.
The View Controller Stack
Navigation view controllers are stack based. The newest view controller is the visible one. It is on top of the last one we saw.
If you are not familiar with the stack data structure, it is useful to understand stacks and their nomenclature a little better. Stacks work a lot like a deck of cards that are face up.
You can only see the top card. When you place a card on top of the stack, you push a card on the stack. When you remove a card from the stack and show the card below it, you pop it off the stack. We use the terms push and pop a lot to talk about stacks. The two major methods we’ll be talking about popViewController and pushViewController use this nomenclature to explain what they do.
Opening a View Controller in a Xib
Let’s look at a few ways to programmatically move through view controllers by pushing and popping to the navigation stack directly.
Start a new single view project in Swift called SwiftProgNavControllerDemo. Go into the storyboard. Set your preview for iPhone 8 selected for View as: in the lower left of the storyboard”

Select the blank view controller. Be sure to select the controller by clicking the ![]() icon and not the view. From the drop down menu select Editor>Embed in > Navigation Controller.
icon and not the view. From the drop down menu select Editor>Embed in > Navigation Controller.
In the view controller, add a label and a button so your code looks like the diagram below. If you wish you can also color the background:
Open the assistant editor. Control-drag the button and make an action for a UIButton called nextButton. Remove everything else from the class for now. Add the following two lines to the nextButton
let vc = TwoViewController(
     nibName: "TwoViewController",
     bundle: nil)
navigationController?.pushViewController(vc,
     animated: true)
Line 1 creates a view controller of class TwoViewController, using the XIB of the same name. Line 2 pushed the view controller on the navigation controller stack maintained by ViewController. Your code should look like this when done:
class ViewController: UIViewController {
    @IBAction func nextButton(_ sender: UIButton){
    let vc = TwoViewController(
        nibName: "TwoViewController",
        bundle: nil)
     navigationController?.pushViewController(vc,
        animated: true)
    }
}
We need another view controller as a destination. Press Command-N or click File>New>File… Choose a iOS source template of Cocoa Touch Class. Make the new file a subclass of UIViewController and name the file TwoViewController. We’ll work with a xib for our destination controller. Check on the option Also create XIB file.
You will find a new xib in interface builder. Set it up to look like the illustration below.
In the assistant editor, remove everything to have an empty class. Control-drag the Next button inside the TwoViewController class. Make an @IBAction method named nextButton as an UIButton. Add the following code to the nextButton() method:
let vc = ThreeViewController(
            nibName: "ThreeViewController",
            bundle: nil)
        navigationController?.pushViewController(vc,
                animated: true )
Your code should look like this:
class TwoViewController: UIViewController {

    @IBAction func nextButton(_ sender: UIButton) {
        let vc = ThreeViewController(
            nibName: "ThreeViewController",
            bundle: nil)
        navigationController?.pushViewController(vc,
            animated: true )
    }
}
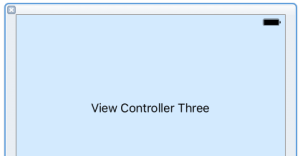
Let’s do this one more time so we end up with three view controllers to push onto the view controller stack. Follow the same procedure as you did for TwoViewController, but name it ThreeViewController. Set the view to look like this:
There’s no buttons here, so you have no actions to set. Change your simulator to iPhone 8. Build and run. Tap the Next button and move between the three view controllers.
Pushing a view controller from a xib is two lines of code:
let vc = ViewControllerName(nibName: "nameOfNib", bundle: nil)
navigationController?.pushViewController(vc, animated: true )
The first line creates the view controller. I tend to keep it simple and use vc, though if I had more than one, I’d be more descriptive.
Xibs are probably one of the most common uses for pushing a view controller. There are situations where you cannot use the storyboard and this is a good traditional alternative. Often self-contained reusable modules will use a xib instead of a storyboard.
Programmatic Segues to View Controllers
For most uses, I prefer the storyboard over xibs for two reasons: first it is better documentation of the user interface. Secondly, I prefer to let the system do as much of the background work as possible by using the storyboard. The deeper into code you go, the more you have to worry about unexpected bugs.
We can programmatically push a view controller from a storyboard in two ways: segues or storyboard identifiers. We’ll start with segues. One of the first ways anyone learns to use storyboards is direct segues, connecting up a button directly to a view. You can also do segues programmatically, which is useful when you conditionally go to a view.
Go to the storyboard. Add two more view controllers to the storyboard. Label one View Controller Four and the other View Controller five.
Click on the ViewController scene title in the storyboard. From the view controller Icon ![]() on
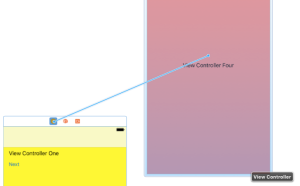
on ViewController, control-drag from ViewController to somewhere on View Controller Four’s content so it highlights.
Release the mouse button. In the menu that appears, select Show.
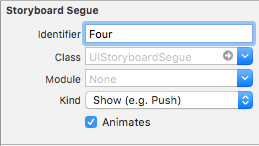
Click on the Show segue icon ![]() to select the segue. Go into the properties inspector and set the segue’s Identifier to Four.
to select the segue. Go into the properties inspector and set the segue’s Identifier to Four.
Drag another button out to the View Controller scene and make the title Four.
Go to ViewController class and add the following method:
@IBAction func fourFiveToggleButton(_ sender: UIButton){
    performSegue(withIdentifier: "Four",
        sender: self)
}
Open the assistant editor and drag from the circle next to the fourButton() method over the Four button and release.
The code above is a mere one line: it runs the segue. If you set the segue identifier correctly, that is all you need to do.
One use is conditional cases. Conditions in the current view controller or model might change. The app may display different view controllers based on those conditions. Let’s try a simple example. Just as we did with View Controller Four, make a segue with an identifier Five by control-dragging from the view controller icon ![]() on View Controller One to the view of View Controller Five.
on View Controller One to the view of View Controller Five.
Select a Show segue. Select the segue by clicking the show segue icon ![]() . In the attributes inspector change the Identifier to Five.
. In the attributes inspector change the Identifier to Five.
Change the code for fourFiveToggleButton to this
@IBAction func fourFiveToggleButton(_ sender: UIButton){
    let normal = UIControlState(rawValue: 0) //beta 1 has no .normal bug#26856201
    if sender.titleLabel?.text == "Four"{
        performSegue(withIdentifier: "Four",
                     sender: self)
        sender.setTitle("Five", for: normal)
    } else{
        performSegue(withIdentifier: "Five",
                     sender: self)
        sender.setTitle("Four", for: normal)
    }
}
The code checks the contents of the title label. If the label is Four it goes to View Controller Four and changes the title label. If the label is Five, it goes to View Controller Five and toggles the label back to Four
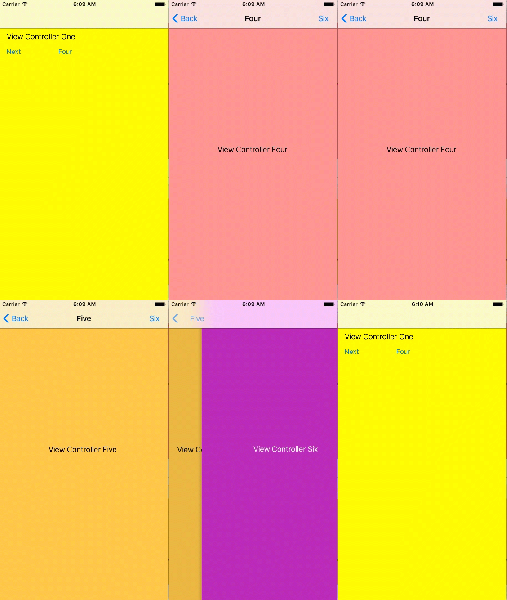
Build and run. we can toggle between the two views.
An Interesting Stack Demonstration
Stacks are linear collections. How we compose that collection on the storyboard might be nonlinear. For example, View controllers four and five might both segue into view controller six. On the storyboard drag out another view controller. Set a background color for it. Label it View Controller Six
For this example, we’ll use the storyboard directly. On View Controller Four, drag a Navigation Item. Title the navigation Item Four. Drag a bar button item to the navigation controller. Title it Six
Do the same for View Controller Five so the navigation bar looks like this:
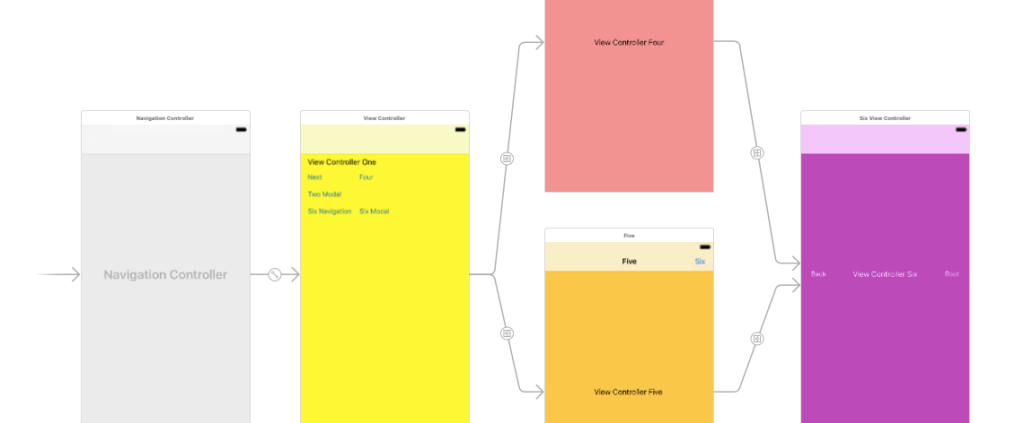
Control drag from View controller Four’s Six button to the Six View Controller. Select a Show Segue. Repeat for the Five View Controller. Control drag from the Six button to the Six View Controller. Select a Show Segue. Your storyboard now has this:
We’ve set a storyboard where we go to Five or Four, and then go to six. Build and run. We can go to Six from both view controllers.
Closing a View Controller
Up to now, we’ve relied on the navigation controller’s Back button. Dismissal of view controllers with popViewController() are common in an application. Almost every delegate between view controllers in a navigation stack will use it. There are several versions of the popping off controller for different uses.
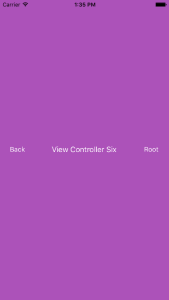
Add two buttons to View Controller Six, titled Back and Root.
Press Command-N to make a new class called SixViewController, subclassing UIViewController. Remove all the methods in the class. In the SixViewController class, create an action backButton:
 @IBAction func backButton(_ sender: UIButton) {
        navigationController?.popViewController(animated:true)
    }
You will get a warning Expression of type 'UIViewController?' is unused. Ignore it for now, we’ll discuss it later.
Also in SixViewController, add to the rootButton() method:
@IBAction func rootButton(_ sender: UIButton) {
  navigationController?.popToRootViewController(animated:true)
    }
Go to the story board and open the assistant editor. Drag from the circle next to backButton to the Back button. Drag from the circle next to the rootButton to the Root Button. Build and Run. Go to Six. Press the new Back button. You go back to Four. Go to Six again and press the root button. You go back to One.
There are three versions of pop: popViewController(), popToRootController(), and popToViewController() The most Common is popViewController() which removes the top view controller from the stack. popToRootViewController() and popToViewController() pops everything or everything up to a specific view controller off the stack, returning what it popped off.
Because popViewController returns a value, we are getting the two warnings. We have to do something with the return value. You’ll notice in the error message that we get an optional returned. If nil, there were no view controllers to pop off. Use this to make sure you do have a navigation stack under the current controller. Change the class to this:
class SixViewController: UIViewController {
    @IBAction func backButton(_ sender: UIButton) {
        guard (navigationController?.popViewController(animated:true)) != nil
            else {
                print("No Navigation Controller")
                return
        }
    }
    @IBAction func rootButton(_ sender: UIButton) {
        guard navigationController?.popToRootViewController(animated: true) != nil
        else {
            print("No Navigation Controller")
            return
        }
    }

    }
By using guard and checking for nil the application checks to make sure there is a navigation stack. If not, code handles the error. If there is a segue set to Present modally by mistake and tries popping off the controller, the error gets handled. This is especially important in two situations: when you use a xib in a navigation controller and when you use a Storyboard ID. Both cases are independent of segues. Both can be used as a modal controller and a navigation controller. It’s likely you have modules set up for use in different applications, and sometime they are modal and sometimes navigation controllers. For example, go to the code for TwoViewController. Add the following action:
 @IBAction func backButton(_ sender:UIButton){
        guard navigationController?.popViewController(animated: true) != nil else { //modal
            print("Not a navigation Controller")
            dismiss(animated: true, completion: nil)
            return
        }
    }
We expanded the guard clause slightly here from the previous example. If there is no navigation controller, we must be in a modal. Instead of popping the controller, we dismiss it.
Add a Back button to the Two View Controller:
With the assistant editor open, Control-drag from the Back button we created to the backButton code.
Add another button to View Controller One titled Two Modal.
Open the assistant editor. Control drag the Two Modal Button to make a new action named modalTwoButton. Add the following code to the new action to present a modal view:
@IBAction func modalTwoButton(_ sender: UIButton) {
    let vc = TwoViewController(
        nibName: "TwoViewController",
        bundle: nil)
    present(vc,
        animated: true,
        completion: nil)
    }
Build and run. Tap the TwoModal Button, and the modal view slides up from the bottom.
Tap the Back button and it goes back to View Controller one. Tap the Next button and you slide sideways into a navigation view.
Tap Back and you are back in View Controller One
Using Storyboard ID’s With Navigation Controllers
In between Xibs and the Storyboard are storyboard ID’s. When you want all of your view controllers on one storyboard, but also want to call the view controller from several different controllers you might want to use a storyboard ID. Storyboard ID’s can programmatically called both by modals and navigation controllers. Some view controllers might have a segue at one place and called by a Storyboard ID in another. On the storyboard find View Controller Six
In the Identity inspector, set the Storyboard ID to Six
On View Controller One add two more Buttons labeled Six Navigation and Six Modal.
Control-Drag the Six Navigation Button into the assistant editor set to Automatic. Make an action sixNavigationButton. Now do the same with the modal button. Control-Drag the Six Modal Button into the assistant editor. Make an action sixModalButton.
The two actions are very similar. They will get a view controller from the method
storyboard?.instantiateViewController(withIdentifier:String)
then present it for a modal or push it for a navigation controller. Add this code to the two actions:
@IBAction func sixNavigationButton(_ sender: UIButton) {
        guard let vc = storyboard?.instantiateViewController(withIdentifier: "Six") else {
            print("View controller Six not found")
            return
        }
        navigationController?.pushViewController(vc, animated: true)
    }

    @IBAction func sixModalButton(_ sender: UIButton) {
        guard let vc = storyboard?.instantiateViewController(withIdentifier: "Six") else {
            print("View controller Six not found")
            return
        }
        present(vc, animated: true, completion: nil)
    }
Go over to the SixViewController class. Add the dismiss method to dismiss the modal in the backButton action :
    @IBAction func backButton(_ sender: UIButton) {
        guard (navigationController?.popViewController(animated:true)) != nil
            else {
                dismiss(animated: true, completion: nil)
                return
        }
    }
Build and run. Tap Six Navigation, and you get to the navigation
Tap back and you get back to One again. Tap six modal and you get the modal
Tap back and you get back to One again.
You’ll notice I left the Root button doing nothing for a modal since it has no meaning for modal.
One More Place to Explore: The Navigation Back Button.
For most cases we get a Back button like this on the navigation bar:
But you may notice that the Six controller does this, depending where it is pushed from:
The title for the Back button comes from the view controller below it on the stack. When I push Six from Five, Five shows up as the title in the back button. This is another exploration you might want to take about navigation controllers, which you can find in the post Using the Navigation Bar Title and Back Button
The Whole Code
<h2>ViewController.swift</h2>
//
//  ViewController.swift
//  SwiftProgNavControllerDemo
//
//  Created by Steven Lipton on 7/6/16.
//  Copyright © 2016 Steven Lipton. All rights reserved.
//

import UIKit

class ViewController: UIViewController {
//
// Action for using a story board id for navigation controller
//  let vc = storyboard?.instantiateViewController(withIdentifier: "Six")
//
    @IBAction func sixNavigationButton(_ sender: UIButton) {
        guard let vc = storyboard?.instantiateViewController(withIdentifier: "Six") else {
            print("View controller Six not found")
            return
        }
        navigationController?.pushViewController(vc, animated: true)
    }

//
// Action for using a story board id for modal controller
//  let vc = storyboard?.instantiateViewController(withIdentifier: "Six")
//
    @IBAction func sixModalButton(_ sender: UIButton) {
        guard let vc = storyboard?.instantiateViewController(withIdentifier: "Six") else {
            print("View controller Six not found")
            return
        }
        present(vc, animated: true, completion: nil)
    }

//
// modal example for use with dismissal see TwoViewController
//
    @IBAction func modalTwoButton(_ sender: UIButton) {
        let vc = TwoViewController(
            nibName: "TwoViewController",
            bundle: nil)
        present(vc, animated: true, completion: nil)
    }

//
// Example of pushing a view controller
//navigationController?.pushViewController(vc, animated: true)
//
    @IBAction func nextButton(_ sender: UIButton) {
        let vc = TwoViewController(
            nibName: "TwoViewController",
            bundle: nil)
        navigationController?.pushViewController(vc, animated: true)
    }

//
// Example of Logically pushing a view controller from a segue
// performSegue(withIdentifier: "Four",sender: self)
//
//

    @IBAction func fourFiveToggleButton(_ sender: UIButton){
        let normal = UIControlState(rawValue: 0) //beta 1 has no .normal bug#26856201
        if sender.titleLabel?.text == "Four"{
            performSegue(withIdentifier: "Four",
                         sender: self)
            sender.setTitle("Five", for: normal)
        } else{
            performSegue(withIdentifier: "Five",
                         sender: self)
            sender.setTitle("Four", for: normal)
        }
    }

}


<h2>TwoViewController.swift</h2>


//
//  TwoViewController.swift
//  SwiftProgNavControllerDemo
//
//  Created by Steven Lipton on 7/6/16.
//  Copyright © 2016 Steven Lipton. All rights reserved.
//

import UIKit

class TwoViewController: UIViewController {

//
// A back button for dismissal of both modals and navigation controllers
//
//
    @IBAction func backButton(_ sender:UIButton){
        guard navigationController?.popViewController(animated: true) != nil else { //modal
            print("Not a navigation Controller")
            dismiss(animated: true, completion: nil)
            return
        }
    }
}


<h2>ThreeViewController.swift</h2>


//
//  ThreeViewController.swift
//  SwiftProgNavControllerDemo
//
//  Created by Steven Lipton on 7/6/16.
//  Copyright © 2016 Steven Lipton. All rights reserved.
//

import UIKit

class ThreeViewController: UIViewController {
    }


<h2>SixViewController.swift</h2>


//
//  SixViewController.swift
//  SwiftProgNavControllerDemo
//
//  Created by Steven Lipton on 7/8/16.
//  Copyright © 2016 Steven Lipton. All rights reserved.
//

import UIKit

class SixViewController: UIViewController {

//
// Another back button for dismissal of both modals and navigation controllers
//
//
    @IBAction func backButton(_ sender: UIButton) {
        guard (navigationController?.popViewController(animated:true)) != nil
            else {
                dismiss(animated: true, completion: nil)
                return
        }
    }

//
// A pop to root of the navigation controller example
//  navigationController?.popToRootViewController(animated: true)
//
    @IBAction func rootButton(_ sender: UIButton) {
        guard navigationController?.popToRootViewController(animated: true) != nil
        else {
            print("No Navigation Controller")
            return
        }
    }

    }











Leave a reply to Steven Lipton Cancel reply